4D World (V): 4D Vision and Orientation
Featured Content
- Online 3D voxel viewer
- Polytope browser
- 4D first-person mini-game
In the previous article, we discussed how 2D beings would view photos of our world. Today, a mysterious person claiming to live in 4D space has connected with our computer. They say they have 3D retinas that can directly see 3D images all at once, and they will transmit 3D images from the 4D world to us. They’ve even designed a special viewer for us to view these 3D graphical data! (Best viewed on a computer with Google Chrome for optimal experience. If you’re on mobile, you can first look at screenshots of the viewer.) Since most 4D models you’ve seen before were drawn as wireframes, you might not be used to this 3D voxel coloring method. Therefore, the 4D mysterious person first sends us some purely 3D graphics as training, to prevent us from being completely confused when we see 4D photos.
3D Photos
Remember the 2D beings from the last article? They used both the transparency method and cross-section method to view 2D graphics. We will similarly use transparency and cross-section methods to view 3D graphics. Here are the extraction positions of these cross-sections, and for concise expression later, let’s agree on how to refer to these cross-sections: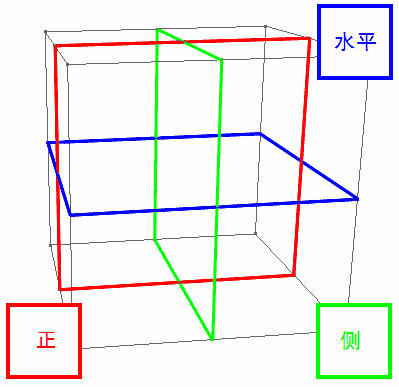
For example, here’s an ordinary egg from our 3D world. Click the image below to enter the viewer (I don’t embed it directly because too many 3D elements on one page would be laggy). Use keyboard keys W S A D Q E to move up/down, left/right, forward/backward, drag with left mouse button to rotate, and middle/right mouse button drag also moves the view.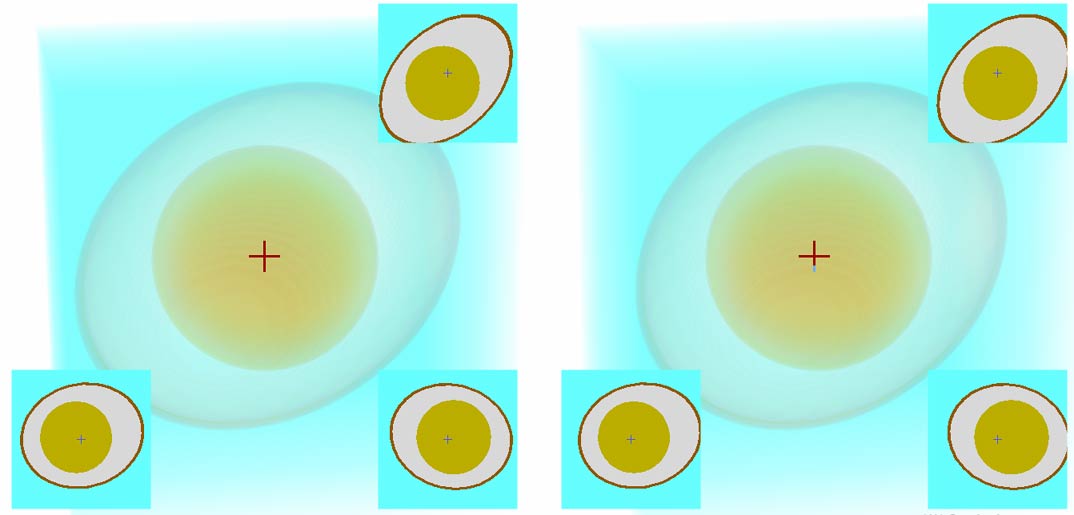
Let me explain what this image means. The left and right images simulate left and right eyes to create stereoscopic depth, helping you better perceive that this photo is three-dimensional. If you can’t do naked-eye 3D viewing, just press the left and right arrow keys back and forth (though the experience will be much worse). The entire egg is semi-transparent, allowing you to see the yolk inside. Yes, we now have the ability to see through the 3D world! Of course, this transparency is because we’ve made these 3D pixels semi-transparent, but we can mentally reconstruct the color of every corner in this 3D image by rotating the view and combining information from cross-sections. You might say this is just a transparent egg, what’s so 4D-superhuman about it? But from now on, we must pretend we can “see at a glance” every pixel (voxel) in the cubic 3D view.
The cost of pretending we can see clearly is that we actually can’t see some details clearly. For example, it’s hard to directly see the eggshell from the 3D transparent photo. So the cross-sections specially designed by the 4D person are still very necessary.
Note that this egg is completely three-dimensional, with nothing four-dimensional in it - this is just a 3D voxel viewer. We first need to train ourselves to get used to this 3D voxel viewer and try to build stereoscopic intuition, because all subsequent 4D landscapes will be displayed in this 3D voxel viewer.
4D Photos
Next, they sent another stereoscopic image, saying it’s a hypercube with a sphere drawn on each cell. This time we fix the camera at the center of the hypercube. Although we can’t move freely (mainly to avoid getting disoriented), we can rotate this photo like we did with the egg. Click the image below to enter the viewer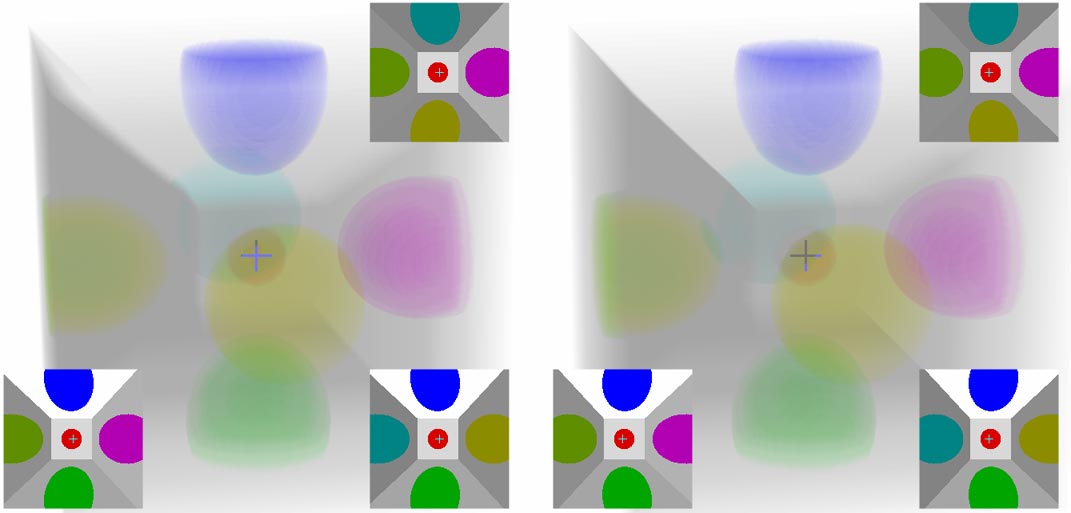
What am I seeing?
We can easily see seven faces in the view - a perfect cube in the center, with its six faces extending outward to form truncated pyramid shapes. Comparing with the normal cube photo below should make it easier to understand. The view has five faces - a perfect square in the center, surrounded by four trapezoids. After rotating the hypercube, some spherical patterns at the centers of cells may no longer intersect with the cross-sections, so you’ll see these spheres changing size and appearing/disappearing.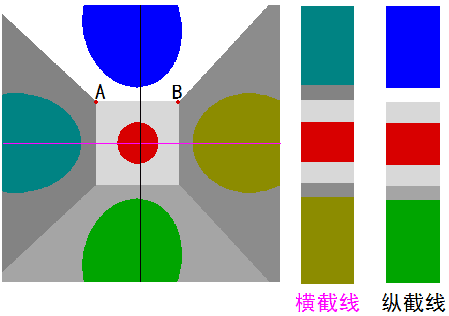
Note that what can be directly seen of 4D objects are 3D cells (we call 3D faces “cells” to distinguish them from 2D faces). 2D faces no longer have definite colors - they’re just 2D edges of 4D objects. By analogy to 3D, you can’t specify the color of line segment AB in the image above. There’s another interesting phenomenon: in the 3D world, no matter how thin a plastic film is, as long as it’s opaque, we can see it when facing it directly. But take it to 4D and that’s not the case - an infinitely thin plastic film has nearly zero volume in a 4D person’s view and cannot be seen clearly. The lower-dimensional analogy is: hair is opaque, but too thin to see clearly.
Entering the Fourth Dimension
The 4D person now tells us this image isn’t just a static picture - you can use right-click and middle-click to rotate this hypercube to see its various faces! Note that left-click rotation only occurs within the 3D view. You can even scroll the mouse wheel to make the camera move out from inside the hypercube! When viewing the hypercube from outside, we can see at most four faces at once - can you find that angle? Click the image below to enter the viewer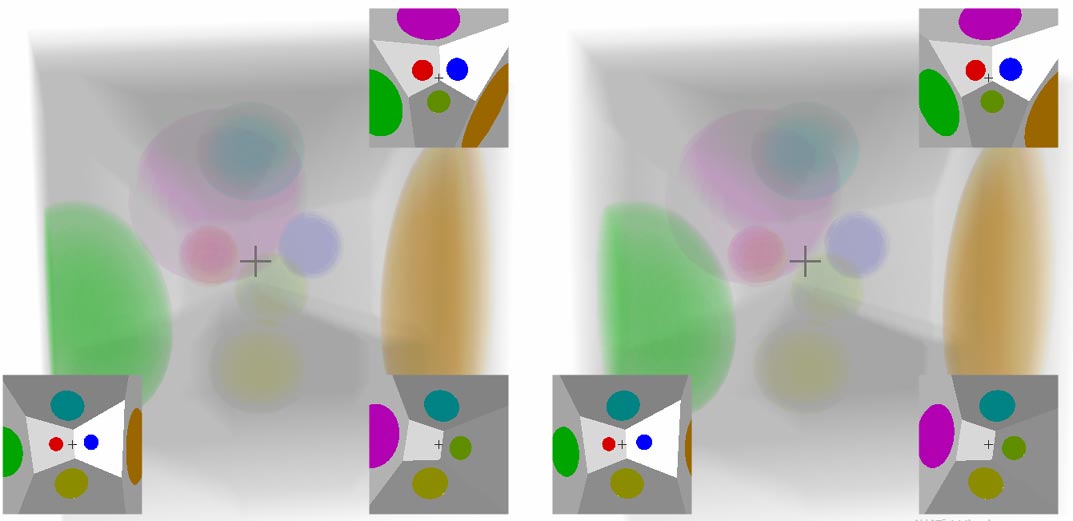
What did I do to the hypercube?
- When you drag with left-click, the model rotates in 3D space: you’re just rotating your viewing angle of the 3D voxels, the composition of the 3D image in the view doesn’t change; but since 3D voxels may no longer be on the cross-section after rotation, the 2D images on the cross-sections will constantly change. This rotation is analogous to directly rotating the photo itself in 2D:
- When you drag with right-click, the model rotates in 4D space: your actual 4D camera position and orientation change. At this point, the voxels composing the 3D image will change, specifically manifesting as the small sphere in the center deforming into a large, flat ellipsoid on the side; but you’ll find that some changes in the cross-sections look more like viewing a regular 3D object from different angles. This rotation is the same when analogized to 2D - when a cube rotates, the small circle in the center moves toward the side as a large, flat ellipse, while the ellipse on the other side shrinks and moves toward the center:
- You might notice that middle-click can also rotate the cube. If you’ve already understood the two types of rotation above, middle-click won’t be a problem for you (hint: it’s a combination of both rotations). The left/middle/right button functions are designed following the spherical projection software Jenn3D.
Experiencing 4D Spatial Depth
Now we can directly experience the stereoscopic spatial sense of 3D voxel images, but still can’t build intuitive feelings for 4D. Let’s see how to get a complete “4D spatial sense”: (If you can’t do naked-eye 3D viewing, this 4D spatial sense might be impossible to experience unless we develop a VR version of the viewer in the future)
You sit in front of a 2D monitor, each point on the image has 2D coordinates $x$, $y$, plus stereoscopic vision from left and right eyes and transparent pixel processing, you can roughly know each point’s $z$ coordinate. The $x$, $y$, $z$ coordinates are the pixel coordinates on the 3D voxel display - so from just viewing 3D photos, we’ve already achieved this. But to understand 4D more intuitively, we also need to have the 4D person’s left-right eye hyper-stereoscopic vision: sensing the fourth-dimensional depth $w$ of each voxel. What is the 4D person’s left-right eye hyper-stereoscopic vision? The principle is the same: through two cameras (or the 4D person’s eyes) taking two 3D photos, the 4D person’s brain can generate depth perception in the fourth direction.
Unfortunately, our brains can at most imagine and mentally fill in one dimension (which we’ve already used up to see 3D photos), and we absolutely can’t squeeze in another dimension. What to do? One solution is to let that stereoscopic depth dimension alternate its use: previously we assigned it to the $z$ direction of 3D photos, we can also assign it to the fourth dimension’s $w$ depth, as long as they don’t conflict. But stereoscopic vision is inherently 3D images - I’ve tried directly displaying left and right 3D photos taken in 4D space as left and right images, but the brain cannot process the information inside. So the best approach is to display the fourth dimension’s $w$ depth on separately extracted cross-sections. So the stereoscopic depth you saw in different parts earlier represents different meanings. Now let’s use a hypercube frame as an example: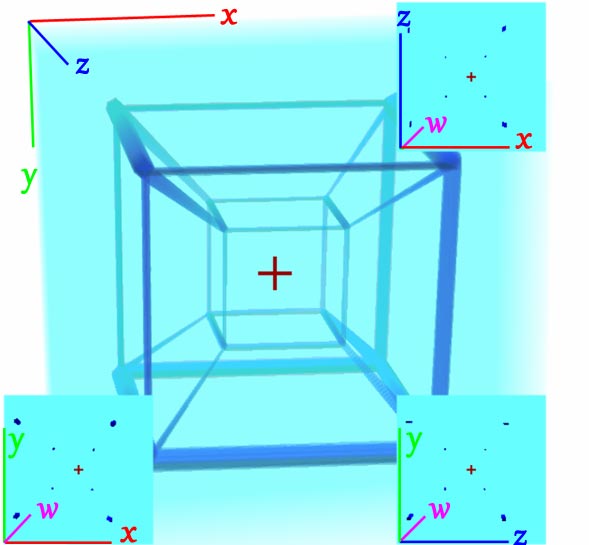
Question: Is the small cube inside the large cube?
Anyone slightly familiar with 4D knows that the small cube is just a perspective phenomenon from 4D projection to 3D - they’re actually the same size, but the small cube is farther from us, so it looks smaller. But it is indeed inside the large cube when projected onto the 3D photo. The stereoscopic vision here also gives us the feeling of nested large and small cubes: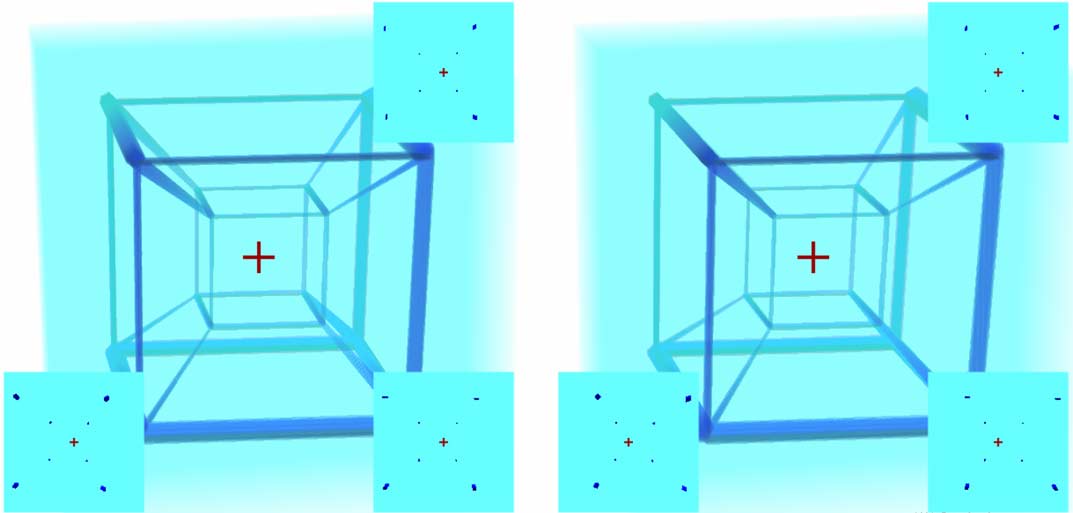
Let’s look at the three cross-sections. Since cross-sections intersect edges to get points, the three cross-sections can respectively capture four points of the large cube and four points of the small cube. The left and right cross-section parallax is set to the fourth dimension’s $w$ depth, so we see that the small cube is indeed behind the large cube. Although we can only know the fourth dimension $w$ depth at the cross-sections, we can use translation, rotation, and other methods to sweep all pixels through the cross-sections. I admit this method isn’t intuitive, but it’s the most balanced result currently.
Viewing Various Other Polytopes
Now let’s look at more complex 4D polytopes: Click the image below to enter the polytope library viewer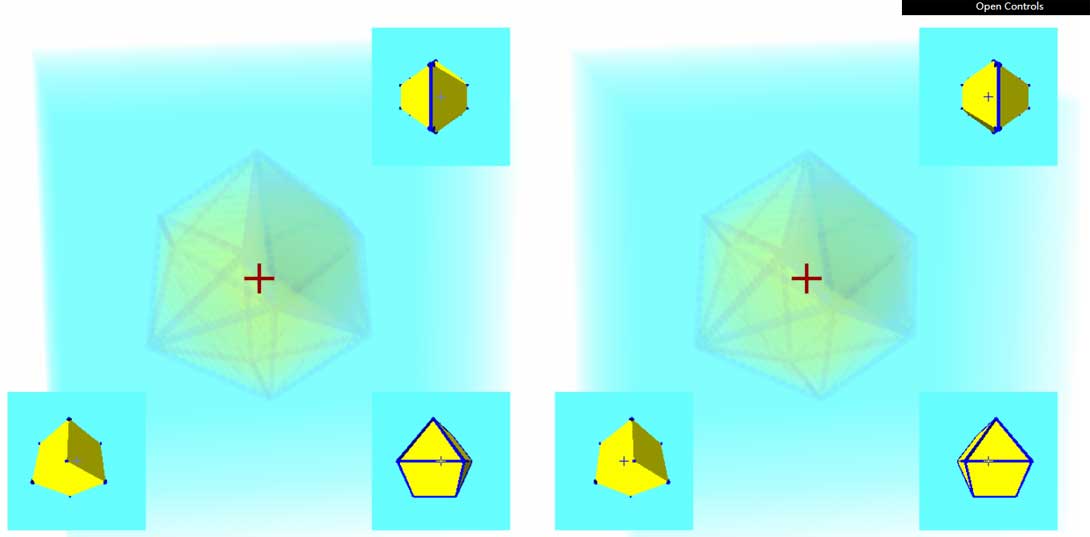
Clicking in shows a regular 24-cell viewed from outside. You can also scroll the mouse wheel to view from inside. (Viewing from inside actually feels a bit like looking at spherical projection)
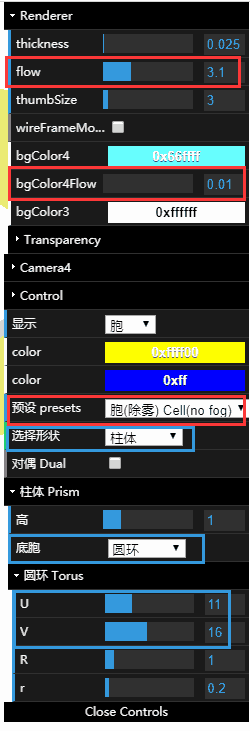
Click “Open Control” in the upper right to expand the quick menu, where you can switch between observing various geometries in the shape selection dropdown. For example, a torinder:
- First select “Prism” in the Object selection dropdown
- Select “Torus” in the base cell dropdown under Prism
- An 8-segmented torus appears in the view. Adjusting the U and V values in the Torus section changes the number of segments - more segments make the torus smoother but laggier.
- Since the torinder is a curved-cell figure, there’s no need to display edges that become abnormally messy with increasing segments - they consume rendering resources and cause lag. Select Display->Cell to hide them.
- If you find the blue background fog too heavy, expand the Render section and reduce the bgColor4Flow value; similarly, if the geometry seems too transparent, increase the Flow value (increasing Flow will increase opacity of both geometry and background together, so you need to correspondingly reduce bgColor4Flow). Of course, if these settings seem too complex, you can directly select the Cell(less fog) option from the presets dropdown.
- By adjusting the height to change the prism height, we can increase this value or set it to 0 to observe and compare.
If you find the 3D view has rough aliasing, press the large keyboard + - to adjust the 3D view $z$-axis resolution. The 3D view is essentially many cross-section layers stacked together - more cross-sections mean higher resolution but laggier performance, so please adjust carefully.
How should I understand these shapes?
If you’ve completely read through my previous 4D space series, you should be able to understand most of the geometries here (at least through logical reasoning). I believe you don’t have any intuitive understanding of these figures, but we might as well analyze to figure out what we’re seeing.
Let’s still use the torinder as an example. First, we set Prism->Height to 3 to get a long torinder hollow tube. If you haven’t rotated the view, you’ll see this figure: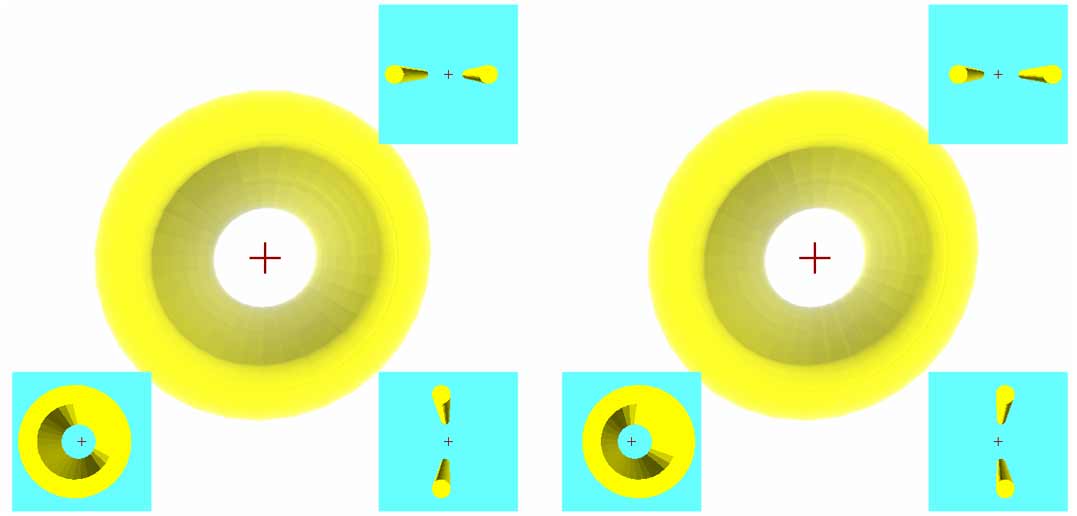
What? You say you can’t see it’s a tube? Let’s drag horizontally with the right mouse button to rotate a bit: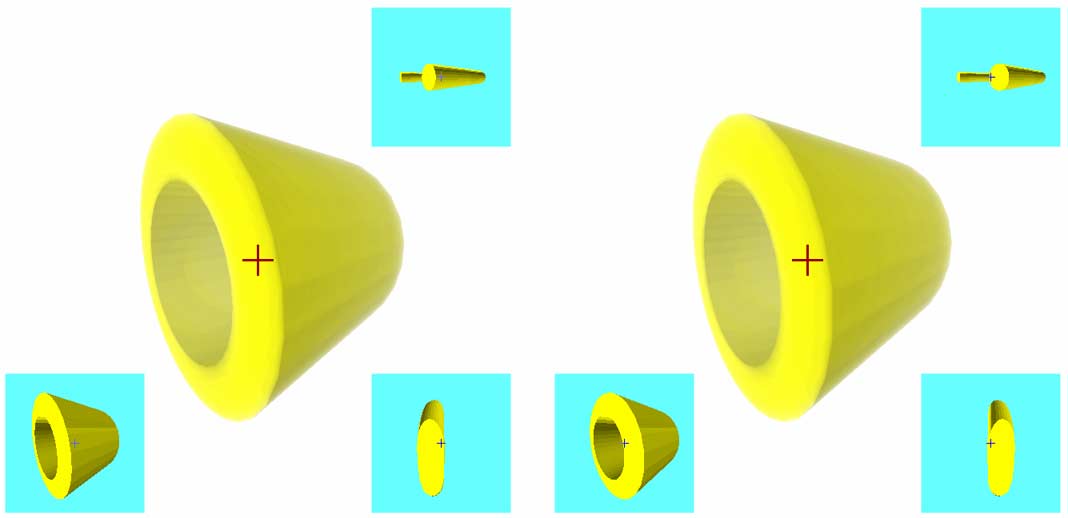
We notice the figure in the 3D view has almost no stereoscopic depth, indicating this thing is very thin in the $z$-axis. Looking at the lower right $yz$ side cross-section also shows its thickness in the $z$-axis is just the torus’s minor radius. From the lower left $xy$ frontal cross-section and upper right $xz$ horizontal cross-section, we can clearly see this is a prism with height in the $w$ direction. The cross-sections also show two 3D prisms, but the prism bases are cross-sections of the torus…
Actually, calling it a tube isn’t quite right either. Although it’s closed on the lower left frontal cross-section, from the upper right horizontal cross-section you can clearly see this tube is completely open - water would leak out completely. If 4D people really wanted to make water pipes, they should choose closed figures like spherical shell (hollow sphere) prisms.
If we return to the initial front view and drag with middle-click, we’ll directly see a cylinder in the 3D view: this is also a side view.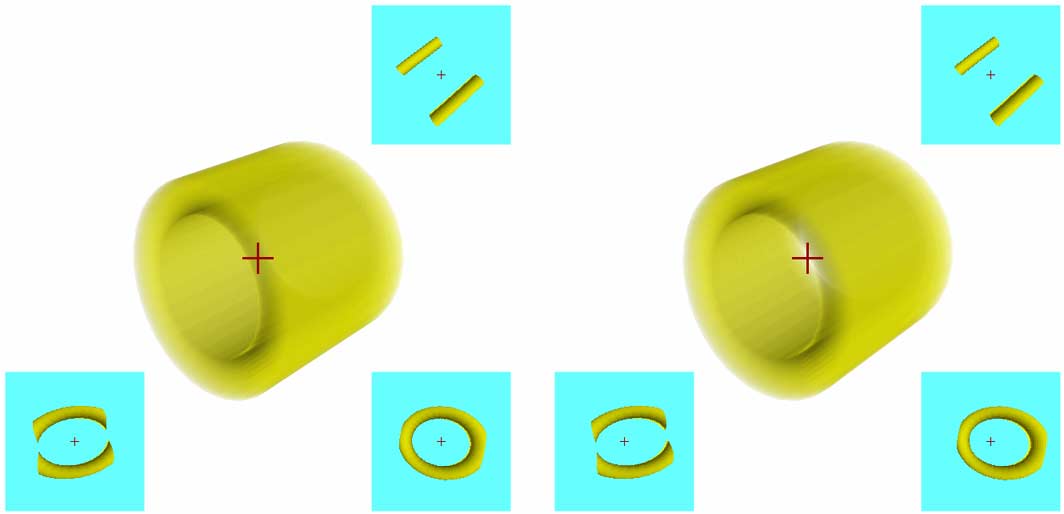
There are various figures in the polytope library to try. But note a few things:
- Some figures with many faces may lag (like the hypersphere), suggest turning off edge rendering (Display->Cells). But if you really want to see edges, press
Cto enable wireframe mode. In wireframe mode, the default $z$-axis stacking resolution isn’t enough - press the large keyboard+to appropriately increase resolution. - If you find the cross-section views too small or large, press
;'to adjust. - More hotkeys can be found here.
You might be feeling a bit dizzy now. Remember whenever you don’t understand the image, you should think about whether there’s a similar predicament for 2D beings viewing 3D. Sometimes this analogy will give you sudden clarity, because you’ll realize that viewing 3D objects from different angles is all processed by your brain’s built-in “graphics card” - everything is instantaneous intuition. But when you come to 4D space, you can instead think through your brain (“CPU?”) backwards about why objects appear that way.
When you become familiar enough with 4D images, you’ll find you gradually no longer need to analyze the deformation of various parts of figures each time, and don’t need to understand through lower-dimensional analogies - then your new intuition for 4D space is established. Here’s a flowchart of how beings of each dimension understand higher dimensions: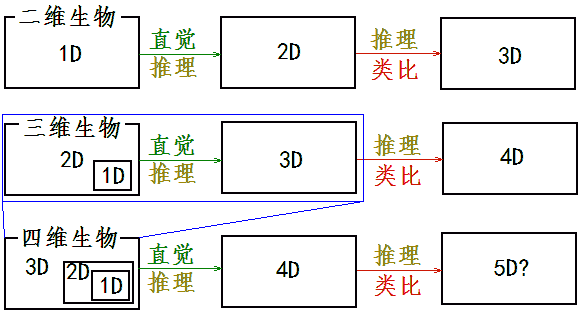
Taking a Walk in the 4D World
After getting familiar with basic single geometries, the 4D person finally invites us into the 4D world.
This world has gravity, so there’s an up-down direction; we’ll mark the direction you’re facing as forward (the 4D depth $w$ perpendicular to the 3D view), and the opposite direction is backward. In the 3D world, the directions perpendicular to both up-down and front-back are left-right, but in 4D, there are still two perpendicular directions undefined. So we can only forcibly define left-right directions and a new type of direction according to the diagram below. But this new direction has the same properties as left-right - it’s essentially also a lateral direction. We call it front-back here only because it’s the front-back of the 3D stereoscopic photo display ($z$ direction). So this article calls them “ana” and “kata” directions.
You can move freely in first-person perspective. Here are the controls:
Use W S A D to move forward/backward/left/right, the new lateral direction ana/kata (front-back of 3D view) uses Q E to move, hold spacebar to rise, and you’ll fall back to the ground under gravity when released. Moving the mouse up/down/left/right or U O J L lets you look around in all six directions (note 4D has six “directions around” not four), corresponding to looking toward ana, kata, left, and right. Finally, mouse wheel or I K keys control looking up or down; press Z X to rotate the 3D view image, press C to show edges (actually drawing vertices of each cross-section) to see object outlines clearly in blurry transparent images. Click the image below to enter: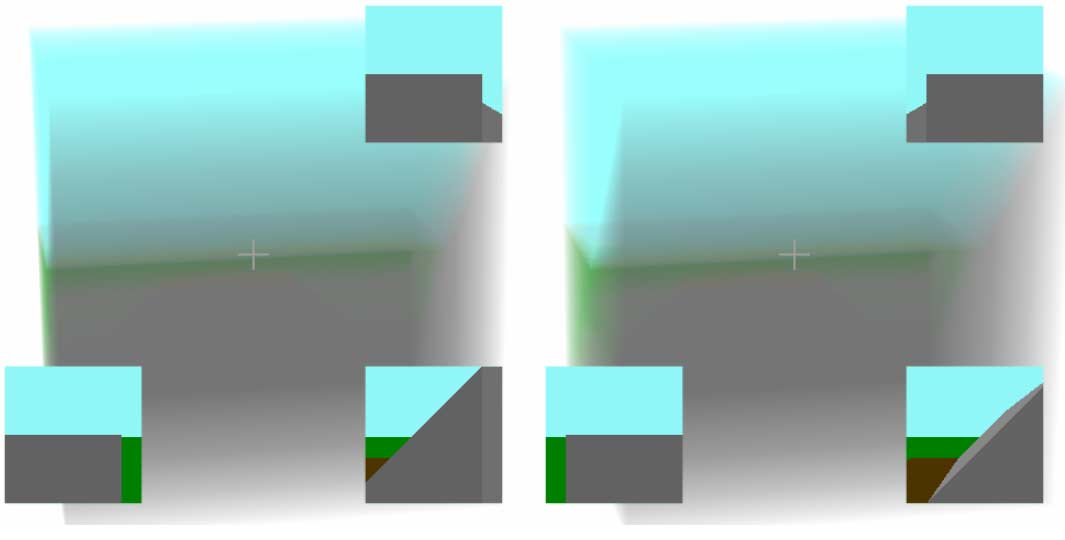
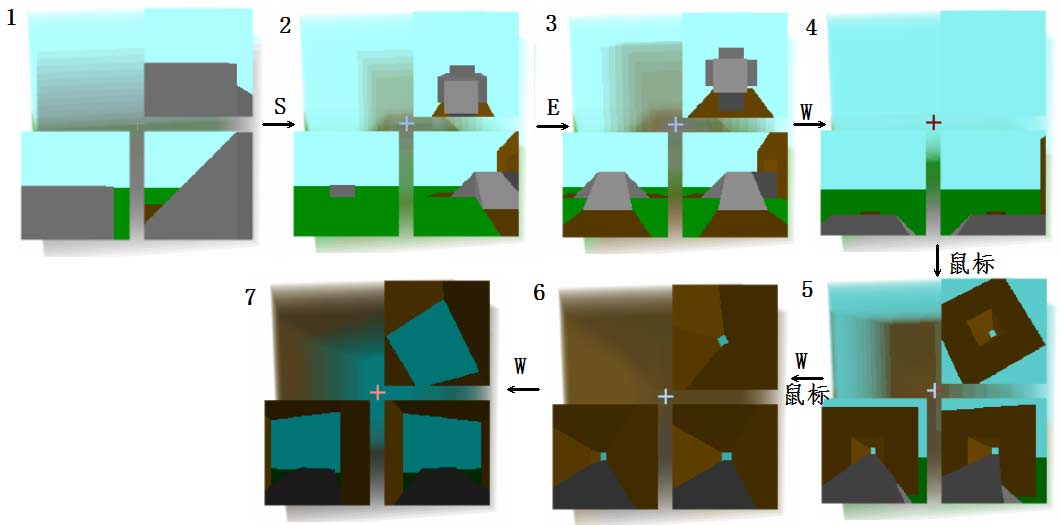
Can you climb up the slope to reach the platform and pass through the 4D tunnel without using the jump key to cheat? If you have difficulty, here are my usual steps and way of thinking:
- First I press
Sto back up and observe the surroundings. - I see the slope in the lower right cross-section, so I want to first adjust position to align with the slope then go up.
- The lower right side cross-section is the $yz$ direction cross-section, where the horizontal axis is $z$ direction (ana/kata), and the vertical axis is the $y$ gravity direction. I need to go right, corresponding to ana, so press
Eto move and align with the slope. You’ll find that after aligning with the slope, the slope also appears in the lower left cross-section. PressWto advance and climb to the top. - Use the mouse to look around in all six directions while watching the upper right view. When you see a large rectangular opening, aim the crosshair at this hole - you’ll see the tunnel in the other two cross-sections.
- Adjust direction to enter the tunnel. During this process, you should constantly watch each cross-section below to see if you’re too close to the edge, continuously adjusting to avoid falling.
- After entering the tunnel, if you can’t continue forward, it means you’ve hit the wall. At this point, look at the upper right cross-section - you can clearly see you’ve hit the square hole wall. Use the mouse to re-aim at the center of the square hole to advance through the tunnel.
- Challenge complete!
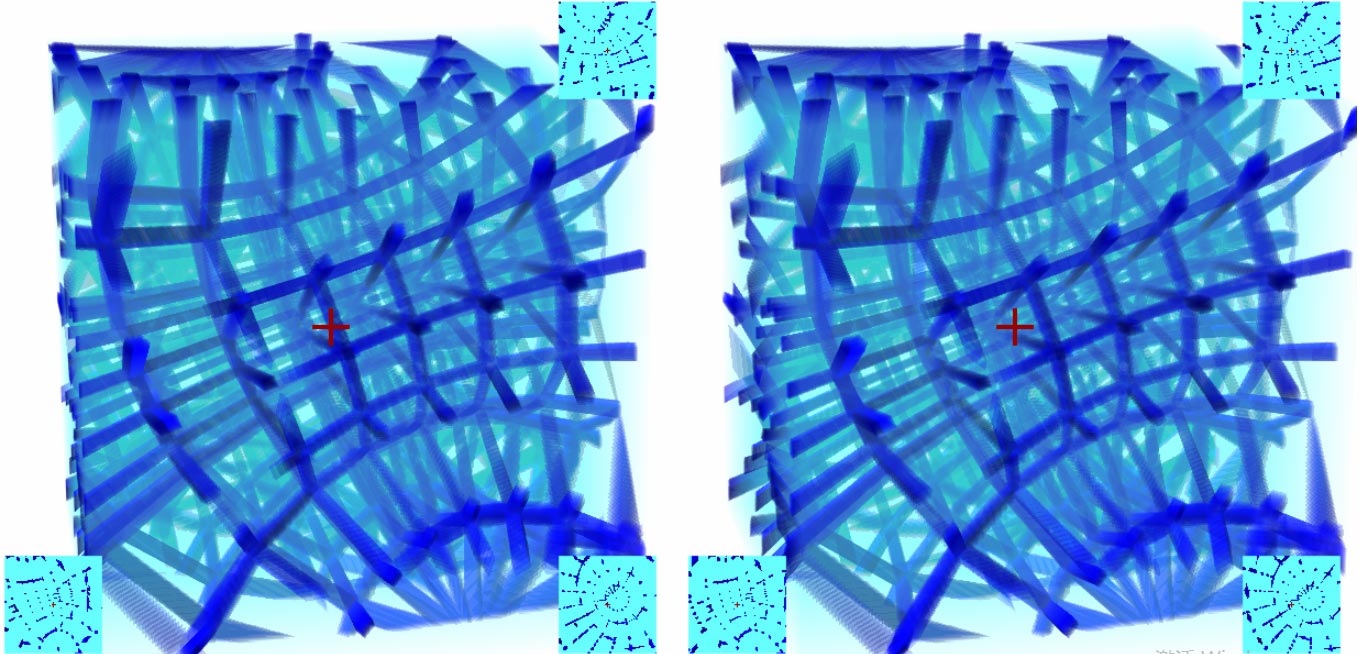
The above process only required looking at cross-sections, without looking at the stereoscopic view. If you think this is cheating, then let’s challenge completing it using only the stereoscopic view. Press ; to minimize the cross-section views. Since the stereoscopic view has too much overlap to see clearly, we press C to show wireframe. Similarly, I’ll explain my thought process:
- First I still press
Sto back up and observe the surroundings. - I find there are upward slopes to the left, right, and ana, but the ana one is largest and should be closest, so I should press
Eto move ana, making the truncated pyramid slanting ana become a downward-facing regular truncated pyramid, then I can go up (don’t understand? See here). But I don’t want to repeat the previous route - I specifically want to take the far one and go up from the left slope, so I pressAto move left to align with the bottom of the slope. - Press
Wto advance to the slope position; - But this position has no landmarks so I’m not sure, we can only walk until it feels about right then turn right to see if we’re aligned with the slope;
- After turning right, I find the truncated pyramid below isn’t straight, leaning kata, press
Qto adjust; - I feel too close to the slope to see clearly if the truncated pyramid bottom is aligned, so press
Sto back up and observe; - Now I find the truncated pyramid below leans left, press
Ato adjust; - After aligning, press
Wto advance upward; - Moving forward, I see the upper road surface just exposed, meaning eye height equals upper platform height, the slope isn’t finished, continue pressing
Wupward; - Go up until you feel the height no longer increases then stop immediately (to avoid overshooting and falling);
- A square thing is already exposed at the edge of the ana view, so use the mouse to look that way, observing small patches of sky color - that’s the sky at the other end of the cave. Note the road surface truncated pyramid must stay directly below, can’t shift left/right or ana/kata to avoid falling;
- Aim at the cave entrance and press
Wto enter the tunnel, while constantly adjusting direction with the mouse, keeping the cave entrance sky aligned with the crosshair (must align in both left/right and ana/kata directions), otherwise you’ll hit the wall.
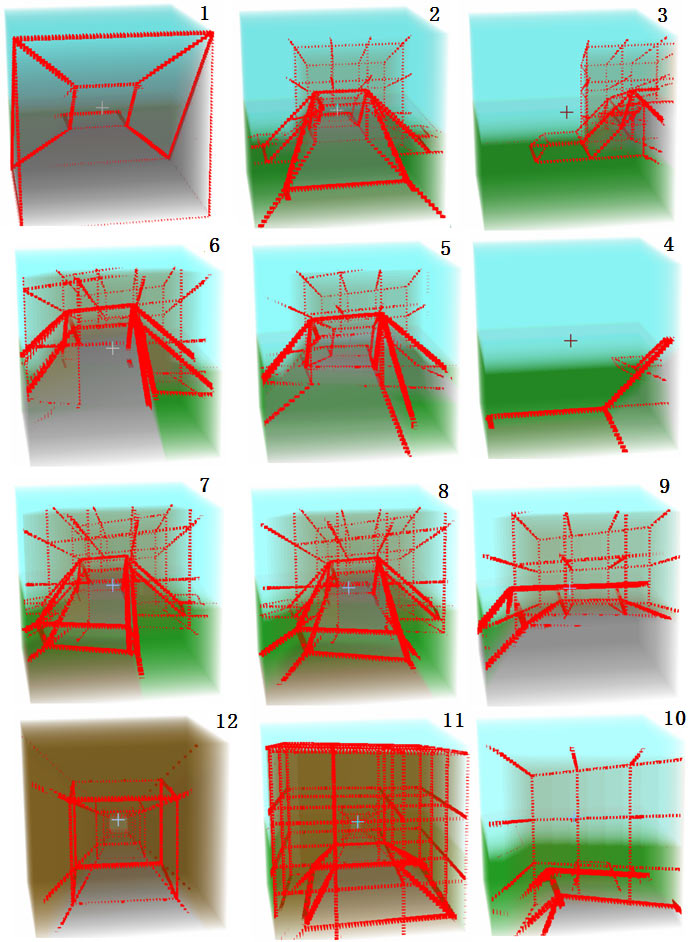
Here I’ll emphasize what counts as aligning the truncated pyramid - see the diagram below. Only the middle truncated pyramid in the diagram is aligned. If it leans left, it means you’re deviating to the right side of the road, and vice versa. Note that left-right and ana/kata are essentially both lateral directions. If the view isn’t cubic (like cylindrical or spherical), 4D people have no external reference to distinguish left-right from ana/kata (they can only use their body organ positions). So if left-right needs to be aligned, then ana/kata also needs to be. If you’re uncomfortable looking at ana/kata directions, you can press Z X to rotate the view. This rotation exchanges left-right with ana/kata while keeping forward direction and vertical direction unchanged (this is the self-rotation we talked about when discussing 4D cars!).

Can you complete the challenge before dark? (First time encountering a 4D planet’s sun and day-night cycle? It’s not as simple as you imagine! See this article)
Top View (3D Map) and Horizontal Cross-Section
If you’re interested in walking using only wireframe in the 3D view, I recommend playing this Java applet: 4DBlocks. It’s a 4D maze and 4D scene viewer based on 3D view wireframe-only display. I previously recommended it here too - it’s also the inspiration for this current 4DViewer.
It’s particularly easy to get lost in that 4D maze - I always stumble to the end by luck (because the maze scale is intentionally set small - you can make it bigger for a challenge). If this maze were purely 3D, meaning it could be placed on the 3D ground of a 4D world, then being able to directly see the 3D map would certainly be simpler than walking directly in the maze. How to get the map? Think about real-world maps - early ones were obtained through surveying, now satellites directly photograph from high altitude. So we can also press spacebar to fly up, then scroll the mouse wheel to look down at the ground. Still using the slope-and-tunnel scene as an example: after reaching a certain height, look down at the ground. Your stereoscopic view background should all be the green of the ground, then you see what’s below: although you can vaguely see 5 slopes and a path to the tunnel, it’s very blurry.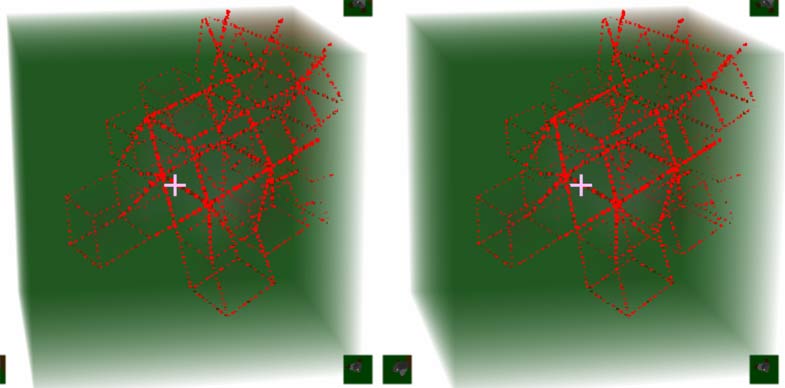
You can press C to turn on wireframe to improve resolution, use Z X to rotate the view and look slowly, but is there a clearer 3D map like the cross-sections? Yes! Let’s fall back to the ground and scroll the wheel to adjust pitch to horizontal. Notice your upper right horizontal cross-section. Let’s stay at the bottom of the slope first without going up. As mentioned before, moving the mouse feels like looking up/down/left/right in the horizontal cross-section. Now please only look at the upper right cross-section, ignore other views, imagine you’re flying a plane, directly controlling direction with the mouse and advancing with W. Since only objects of certain height and slope intersect with the horizontal cross-section, what you see is exactly the 3D map shape of slopes and platforms! Now you can aim at a slope and go up (looking only at the horizontal cross-section can’t tell if it’s a slope or wall, so occasionally look at other views too). You’ll find everything in the horizontal cross-section disappears, leaving only sky color. That’s because your altitude increased and the cross-section no longer intersects with the road surface. Turn the mouse wheel to look down to see the road again. So the upper right horizontal cross-section gives us the convenience of seeing 3D cross-cells at specific heights. Of course, strictly speaking this isn’t a map either (since it’s still first-person perspective).
Further Experiencing the 4D World
Well, today’s journey through the 4D world comes to an end here. If you haven’t had enough, or think these scenes aren’t interesting enough, here you can discover more 4D scenes, games (including 4D Minecraft!), and rigid body physics scenes (see tutorial here)!