Coding Tesserxel (I): Hello Hypercube
Today we begin a new series introducing how to use the 4D graphics engine Tesserxel to write your own 4D scenes. This is aimed at readers who already have some coding background, have worked with Javascript or similar languages, and know basic 3D computer graphics.
The Tesserxel engine includes a 4D algebra library, rendering engine, physics engine, modeling tools, and more. The rendering engine itself has both low-level modules and higher-level encapsulated modules. We’ll first look at the high-level four module, similar to THREE.js, which allows rendering 4D scenes to voxel 3D photo with just a small amount of code.
(It’s recommended to try out THREE.js for 3D graphics before jumping into 4D.) If you are not familiar with Tesserxel yet, please check out the “Play Tesserxel” series first.
Getting Started
Try it Online
If you find local installation troublesome, you can first try the Tesserxel Playground, which can load all example scenes of this series.
The Tesserxel library is already included, so you can edit and preview at the same time. It also supports saving locally using the browser’s localStorage.
Alternatively, you can try playcode.io (stronger code hinting, requires free login to edit code).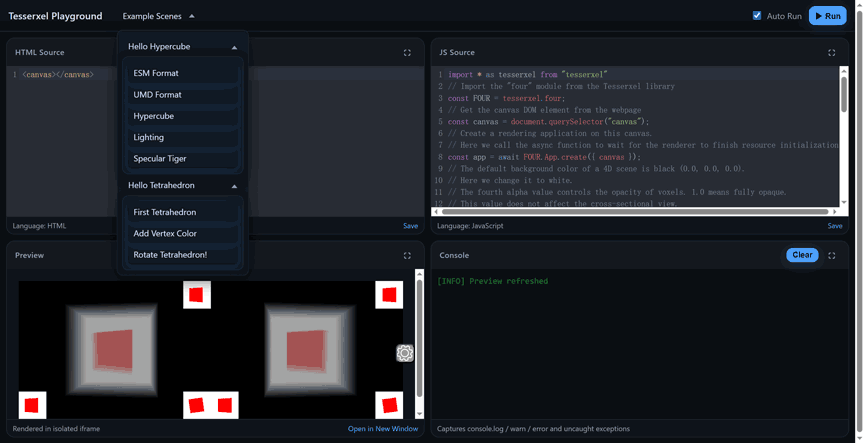
Local Installation
If you want to build a distributable standalone project, every Tesserxel project requires a webpage containing a <canvas> element.
For example, the simplest HTML page:
<html>
  <body><canvas></canvas>
  <script src="script.js"></script>
  </body>
</html>
Save this as .html, then create a script.js file in the same directory, where we will write all our code.
Method 1: Include the bundled tesserxel.js file (recommended for beginners)
Download or reference it directly (must be placed before <script src="script.js"></script>). It’s recommended to download, since direct linking might cause cross-origin issues.
<script src="https://wxyhly.github.io/tesserxel/build/tesserxel.js" type="text/javascript"></script>This format is UMD, which exposes a global variable tesserxel. Its submodules are accessed via .. For example, the 4D vector class in the math module is accessed as tesserxel.math.Vec4. To simplify usage, you can alias frequently used modules:
// By default, defining a 4D vector requires this syntax:
let v1 = new tesserxel.math.Vec4(1,2,3,4);
// Introducing a shortcut can simplify it
const Vec4 = tesserxel.math.Vec4;
let v2 = new Vec4(1,2,3,4);
Method 2: Use import (ESM format)
Another method is using ESM import syntax. First, adjust the <script> tag to <script src="script.js" type="module"></script>, so the browser recognizes import modules, then edit script.js:
// Import the whole package
import * as tesserxel from "https://wxyhly.github.io/tesserxel/build/esm/tesserxel.js"
let v1 = new tesserxel.math.Vec4(1,2,3,4);

// Import only submodules
import {four, math} from "https://wxyhly.github.io/tesserxel/build/esm/tesserxel.js"
let v2 = new math.Vec4(1,2,3,4);
This still loads all modules. If you want to improve performance, you can import only specific submodules to avoid downloading unnecessary codes, but submodules many depend on each other. It’s recommended to import the first-level submodules like math or four.
// Import only the 4D algebra library
import * as math from "https://wxyhly.github.io/tesserxel/build/esm/math/math.js"

// Not recommended: importing minimal pieces may still trigger extra downloads
import { Vec4 } from "https://wxyhly.github.io/tesserxel/build/esm/math/algebra/"
Method 3: Install via npm and use Typescript (recommended for advanced users)
You can install Tesserxel into your project with:
npm install --save tesserxelThen use Typescript or your favorite bundler (rollup recommended).
Bundling is not strictly required. If not bundling, the browser cannot recognize nodejs-style paths, but you can use importmap to fix that:
<script type="importmap">
{
  "imports": {
    // If you want to import a Node.js module installed locally, provide its path so the browser can parse it correctly
    "tesserxel": "./node_modules/tesserxel/build/esm/tesserxel.js",
    "tesserxel/math": "./node_modules/tesserxel/build/esm/math/math.js",
    // Even without Node.js, you can also shorten the URL
    "tesserxel": "https://wxyhly.github.io/tesserxel/build/esm/tesserxel.js",
    "tesserxel/math": "https://wxyhly.github.io/tesserxel/build/esm/math/math.js"
  }
}
</script>
The Simplest Scene
Tesserxel uses the WebGPU API for efficient rendering. Like WebGPU, it uses many async functions. If you don’t know async functions, just remember: add await before calls, wrap code in an async function, and then call it.
Here’s an example (comments translated inline):
// Before here, you should already have imported tesserxel

// All code is wrapped in an async function
async function load() {
    // Import the "four" module from the Tesserxel library
    const FOUR = tesserxel.four;
    // Get the canvas DOM element from the webpage
    const canvas = document.querySelector("canvas");
    // Create a rendering application on this canvas.
    // Here we call the async function to wait for the renderer to finish resource initialization
    const app = await FOUR.App.create({ canvas });
    // The default background color of a 4D scene is black (0.0, 0.0, 0.0).
    // Here we change it to white.
    // The fourth alpha value controls the opacity of voxels. 1.0 means fully opaque.
    // This value does not affect the cross-sectional view.
    app.scene.setBackgroudColor({ r: 1.0, g: 1.0, b: 1.0, a: 1.0 });
    // Define the geometry data of a tesseract (hypercube)
    let cubeGeometry = new FOUR.TesseractGeometry();
    // Define the material of the tesseract.
    // BasicMaterial means a pure color material. We set it to pure red.
    let material = new FOUR.BasicMaterial({ r: 1.0, g: 0.0, b: 0.0, a: 1.0 });
    // Define a tesseract mesh using the geometry data and material
    let mesh = new FOUR.Mesh(cubeGeometry, material);
    // Later we will make the tesseract rotate, so we set it to update
    // its coordinates each frame. By default it will not update.
    mesh.alwaysUpdateCoord = true;
    // Add the tesseract into the scene
    app.scene.add(mesh);
    // By default all objects are at the coordinate origin.
    // So we need to move the camera backward a little bit to see the tesseract at the origin.
    // Note: The w-axis points behind the camera (similar to the z-axis in 3D graphics)
    app.camera.position.w = 3.0;
    // By default, all voxel cube controls require holding down the Alt key to activate.
    // We can manually set the key configuration to empty to remove this requirement.
    app.retinaController.keyConfig.enable = "";
    // Start the frame loop
    app.run(()=>{
        // Each frame, rotate 0.01 radians in both the xw and yz planes
        // to get an isoclinic double rotation
        mesh.rotates(tesserxel.math.Bivec.xw.mulf(0.01).exp());
        mesh.rotates(tesserxel.math.Bivec.yz.mulf(0.01).exp());
    });
}

load(); // Execute
The App.create function in module four automatically creates Scene, Camera, Renderer, ControlRegistry. You could also do it manually if you prefer.
Coordinate System and Vec4 Class
Let’s see Tesserxel’s 4D coordinate system: In the camera coordinates, x, y, z are the same as in normal 3D graphics (y is up, x is right, z points out of the 2D screen). Since we are in 4D, z means “out of the 2D screen but within the voxel cube”, while w points out of the 3D voxel screen, that is, points “behind” the 4D camera.
Each object in the scene (mesh, light, camera) has a position property, represented by a 4D vector (Vec4) object. Here are common vector operation Examples:
// Set the mesh position to (1,0,0,0)
mesh.position.set(1,0,0,0);
// Create a new Vec4 object, the old Vec4 memory will be automatically garbage collected
mesh.position = new Vec4(1,0,0,0);
// Directly change its component value
mesh.position.x = 1;
// Set the mesh position to the value of meshPos, copy method does not create a new object
let meshPos = new Vec4(1,0,0,0);
mesh.position.copy(meshPos);
// The above copy is equivalent to:
mesh.position.set(meshPos.x, meshPos.y, meshPos.z, meshPos.w);
Vectors can be added, subtracted, multiplied, normalized, etc. Details will be discussed in the next article.
4D Orientation and Rotation
This may be the most complex part. For the technical details of rotation in 4D space, see here. Below we’ll only cover the simplest usage. Just as 3D rotations are represented by an axis plus an angle, 4D rotations are represented by a plane plus an angle. A bivector (the 2D version of a vector) is a special algebraic system used to represent planes.
Bivec.xw and Bivec.yz are unit plane bivector constants predefined inside Tesserxel.
Note: Do not modify the component values of these predefined constants, and do not perform set operations on them. Tesserxel itself uses them internally, and modifying them will cause unpredictable errors and bugs!
We multiply the unit rotation plane by the rotation angle (in radians) using the mulf function (short for multiply by float). Finally, the exp function converts the plane’s bivector algebra into rotation algebra, and then we call the rotates method to perform the actual rotation. In the earlier example, we rotated on two completely perpendicular planes, which combined into an isoclinic (Clifford) double rotation:
mesh.rotates(Bivec.xw.mulf(0.01).exp());
mesh.rotates(Bivec.yz.mulf(0.01).exp());
````

Besides directly assigning to the `position` property, you can also move objects with the `translates` method, which supports chain operations:

```javascript
// Move the object’s position 0.1 units along the y-axis, then rotate 30° around its own origin in the xy-plane
mesh.translates(Vec4.y.mulf(0.1)).rotates(Bivec.xy.mulf(30*Math.PI/180).exp());
General Architecture of the Module Four
In the module four, rendering a 4D scene generally requires the following:
Scene: the 4D scene, usually containing the following objects, all of which support position and orientation settings:
Camera
Mesh: objects to be rendered. Each Mesh contains:
- Geometry: the specific polytope geometry data
- Material
Light
Renderer: renderer
ControlRegistry: interaction controller
We’ve already learned how to set the position and orientation of objects in the 4D scene. Now let’s look at each type in detail:
Camera
By default, the 4D camera uses perspective projection, with a field of view (FOV) of 90°. The modifiable properties are (defaults shown after equals sign):
- fov (field of view, convertible with focal length) = 90
- near (near clipping plane) = 0.1
- far (far clipping plane) = 100
As in 3D, setting the near and far clipping planes appropriately is necessary for the depth buffer to work correctly. If you are unsure, consult general 3D computer graphics tutorials.
If you want an orthographic projection camera (no perspective foreshortening), use:
app.camera = new FOUR.OrthographicCamera();The orthographic camera has the following modifiable properties (defaults shown after equals sign):
- size = 2
- near (near clipping plane) = -10
- far (far clipping plane) = 10
Note: these parameters configure the camera for rendering 4D scenes, not the camera for rendering 3D voxels. By default, Tesserxel loads a gear icon allowing the user to configure voxel rendering parameters. If you want to specify voxel rendering parameters in code or impose some restrictions, next article will explain them.
Mesh and Geometry
Mesh and Geometry may look similar, but they are very different. Geometry stores the shape data of an object, while Mesh stores the object’s position, orientation, material, etc. in the scene. A scene can have many Meshes sharing the same Geometry. For example, a bunch of multicolored hyperspheres all with the same shape but different positions and materials.
Tesserxel includes the following built-in geometry database:
| Name | Explanation |
|---|---|
| TesseractGeometry | hypercube (tesseract) |
| GlomeGeometry | hypersphere |
| CubeGeometry | cube cell, default normal along y-axis |
| SpheritorusGeometry | spheritorus, lying in the xw-plane by default |
| TorisphereGeometry | torisphere, lying in the xzw-plane by default |
| SpherinderSideGeometry | spherinder side, axis along w |
| TigerGeometry | tiger (duotorus), oriented xy-zw |
| DitorusGeometry | ditorus, main ring in the xyz-plane, large circle in the xy-plane |
| DuocylinderGeometry | duocylinder, oriented xy-zw |
Other shapes will be explained in later modeling articles.
Richer Lights and Materials
In our simplest earlier example, the hypercube used BasicMaterial, rendering as a uniform pure red, so no light source was required. If you want more realistic lighting, besides switching to LambertMaterial or PhongMaterial, you also need to add a light source to the scene. Otherwise, the objects will render as completely black. Lights can also move dynamically, but you must set their alwaysUpdateCoord property to true to enable position updates.
Example 1: Lambert + Directional Light
Lambert material only has a single color parameter, but the brightness varies with the angle between the surface normal and the light direction, making it suitable for diffuse materials. Directional light requires specifying color and direction. The direction must be a unit vector, i.e. length 1. For performance, Tesserxel does not normalize it automatically. For example, in the code below the vector is not unit length, so you must call .norms() to normalize it, otherwise the rendered colors may look strange.
// Lambert material also has only a single color parameter
const material = new FOUR.LambertMaterial([1,0,0]);
const dirLight = new FOUR.DirectionalLight(
  // Light intensity in r/g/b, values may exceed 1
  [0.9, 0.8, 0.8],
  // Specify directional light’s incoming direction, must be normalized
  new tesserxel.math.Vec4(-1, 1, 0, 1).norms()
);
// Don’t forget to add the light to the scene
app.scene.add(dirLight);
// Then do the same: assign the material
let mesh = new FOUR.Mesh(cubeGeometry, material);
// ..... other code unchanged
Example 2: Phong + Point Light
Phong material has not only a color parameter, but also a shininess parameter that controls the size and color of specular highlights, making it suitable for shiny materials.
// Use a smooth tiger (duotorus) geometry
let tigerGeometry = new FOUR.TigerGeometry();
// PhongMaterial takes color, shininess, and specular color (the latter two are optional, defaults are 20 and white)
const material = new FOUR.PhongMaterial([0.93, 0.87, 0.8],10);
// Point light has only the intensity parameter
const pLight = new FOUR.PointLight([0.9, 0.8, 0.8]);
// Its default position is the origin; change position via the methods mentioned earlier
pLight.position.w = 2;
// Don’t forget to add the light to the scene
app.scene.add(pLight);
// Then do the same: assign the material
let mesh = new FOUR.Mesh(tigerGeometry, material);
// ..... other code unchanged
Ambient Light
By default, surfaces facing away from light sources are completely black. If you don’t want the scene to look too dark, you can add a non-directional ambient light AmbientLight.
app.scene.add(new FOUR.AmbientLight(0.3));Example Code Demonstration
All complete example codes can be found in the Tesserxel Playground under the “Hello Hypercube” drop-down menu.