Play Tesserxel (II): Scene Interaction
If this is your first time reading the Tesserxel series, please read the previous article to understand the basic operation methods for Tesserxel’s 4D scenes first. This article will select a few scenes to introduce. We will cover complex revolutions, direct products, and the 4D highway scene. Basic geometric shapes like hyperspheres, spheritorus, and torispheres have been introduced before, so after understanding these more complex scenes, those simple geometries are left for the reader to explore freely.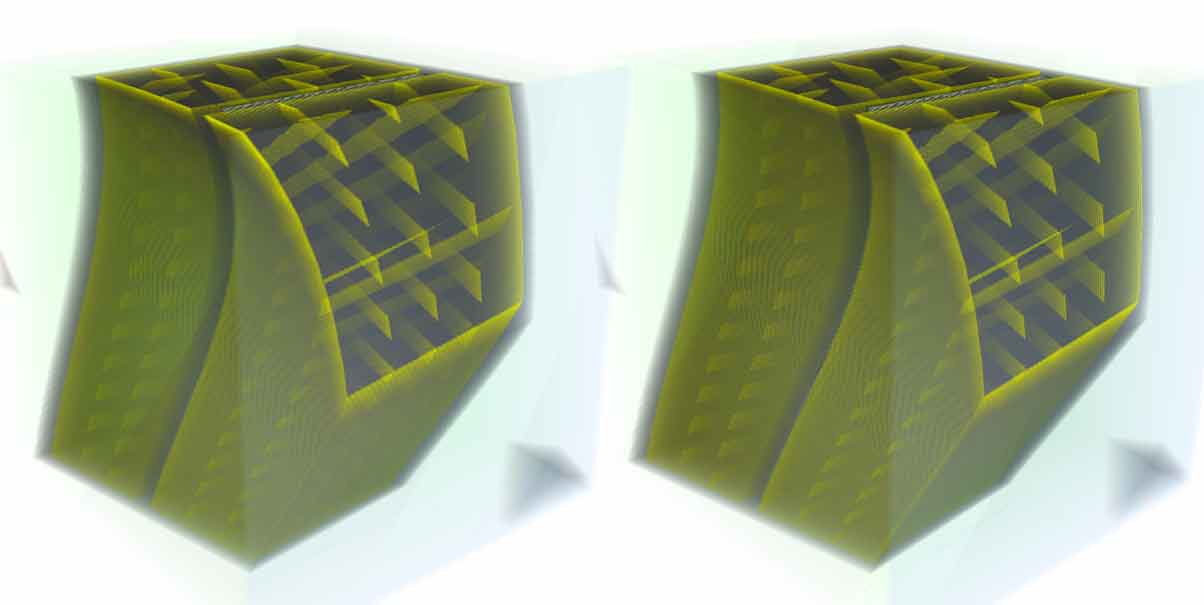 ## Geometry > Monkey Head Revolution
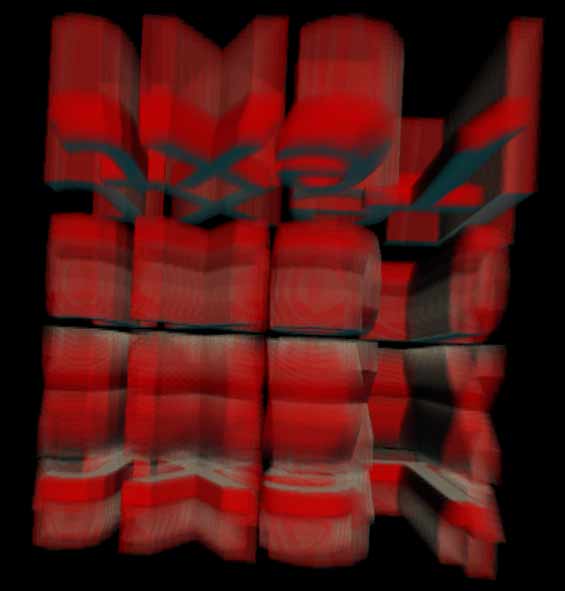
Click the title link to open the Monkey Head Revolution scene (it will take a few seconds to load). It’s said that a 3D graphic can be rotated around a plane in a 4D space to create a revolution. So, I naturally wanted to try this with an arbitrary 3D graphic. The monkey head Suzanne model that comes with the Blender 3D software is a good choice. 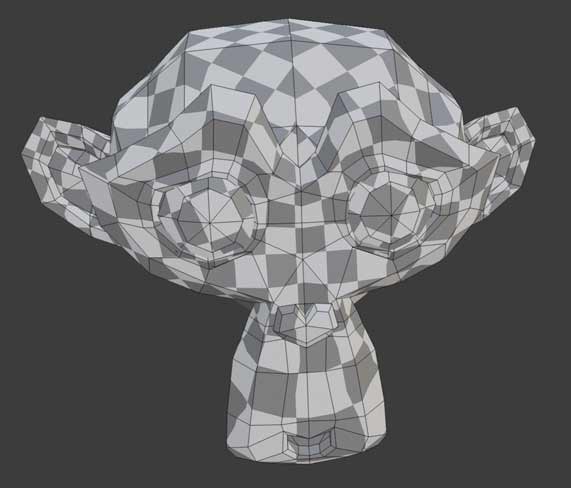 I exported the model in OBJ format, imported it into the Tesserxel engine, and added some rotation and texture rendering code to get this scene. You can press Alt + a number key to switch between different view configurations, and press Alt+Z to toggle stereoscopic 3D, according to your preference. For details, please refer to the previous article, Play Tesserxel (I): Introduction to View Control. When playing this scene, you might find the continuously twisting and deforming monkey head in the cross-section view to be a bit strange. Why does a perfectly good revolution look so distorted? This is actually the fault of the cross-section visualization method. Native 4D beings do not see this. You can also press Alt+3 to turn off the cross-section display. But let’s analyze it anyway:
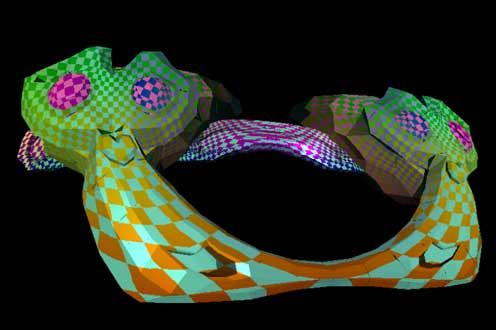
Let’s first look at a 3D revolution. The wine glass made by revolving a person’s side profile is quite beautiful from any angle. We don’t see a twisted face.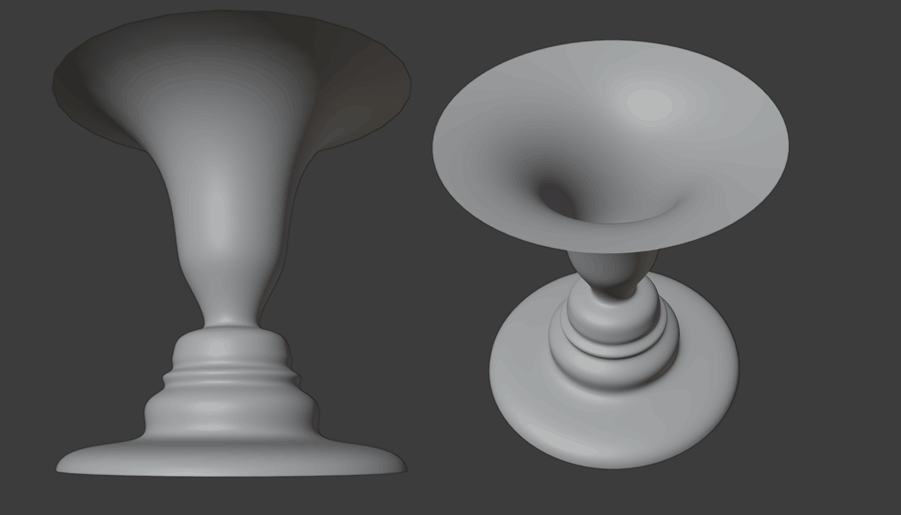
A 4D being’s view of the monkey head is the same: when looking directly at this graphic from a 3D photo, it is a revolution, but the monkey head has been so overlapped with voxels that you can’t make out anything.
How do you operate the camera yourself to find the front view? First, the control method for this scene is trackball mode. In the default view (figure a below), dragging with the left mouse button reveals that the object does not completely fit into the cube’s “field of view,” so you need to scroll the mouse wheel to zoom out (figure b below). Now, if you drag with the left mouse button, you will find it is a ring that is fat on one side and thin on the other. This is because the camera is not positioned correctly in the fourth dimension, and the difference in distance creates a size difference. How do you correct this? First, we need to position the ring correctly in the 3D view. Here, I’ve made the ring parallel to the horizontal cross-section (figure c below), and then used the right mouse button to drag it until it’s facing the camera directly (figure d below). We can drag with the left mouse button to verify that it has indeed become a ring with uniform thickness (figure e below).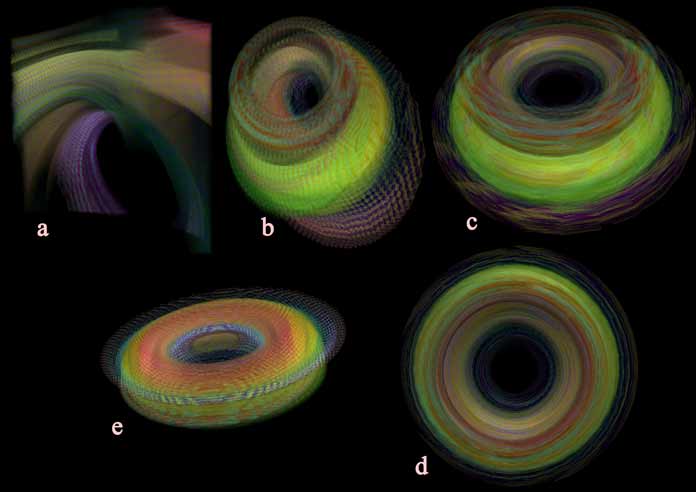
If we were to cut this wine glass with a cross-section, we would indeed see some very ugly, deformed human faces where the two noses are fused together: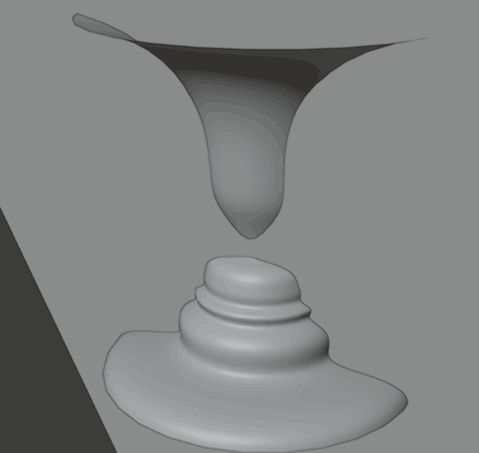
This is consistent with the deformation of the monkey head, but note that when we observe the cross-section view of a 4D object, we are not taking a cross-section of the 4D scene itself, but rather taking a photo of the 4D scene and then taking a 2D cross-section of that stereoscopic photo. This implies that “a cross-section of a photo” and “a photo of a cross-section” are the same (Note: here, “photo” actually refers to perspective projection, and there are actually differences: a cross-section of a photo is affected by some higher-dimensional optical phenomena, while a photo of a cross-section is simply rendering a normal 3D model).
When we look directly from the direction of the cross-section, we see that this cross-section cuts the tip of a person’s nose. Imagine if we showed the pixels on those cross-section lines of this view’s photo to 2D beings; based on the brightness of the pixels, they would naturally perceive the graphic they see as two people with their noses connected.
Here, I want to reiterate a 4D perspective: 4D space is a whole. Although the cross-section method is the most convenient for visualization, it is not how native 4D beings see a 4D object. The cross-section graphics are not easy to understand. The cross-section view is best used as a supplement to the 3D photo; it only tells us the specific distribution of colors in the blurry, overlapping middle part of the 3D translucent photo.
In fact, the drawing principle of my 4D engine is also based on the idea that the geometry of a “cross-section of a photo” is the same as “a photo of a cross-section.” The material, texture, and lighting also need to be calculated based on the 4D coordinate information when calculating the cross-section. Ultimately, when coloring each pixel, Tesserxel can tell that this is not “a photo of a cross-section,” but “a cross-section of a photo.” I will write a dedicated article in the future (I’m digging a hole for myself again, as I haven’t filled the old ones yet…) to explain the methods and corresponding graphics algorithms for visualizing 4D graphics that I know of.
Geometry > Direct Product Series Scenes
In 《4D Space (V): More Geometries (Part 1)》, I mentioned a large category of geometric shapes called “direct products.” It can be intuitively understood as a generalized cylinder with a 2D base and a 2D height. For example, we have seen the direct product of the following shapes:
- Rectangle $\times$ Rectangle $=$ Hypercuboid
- Rectangle $\times$ Circle $=$ Cylinder-prism
- Circle $\times$ Circle $=$ Double Cylinder
- Regular $n$-gon $\times$ Rectangle $=$ Regular $n$-gonal Prism-prism
- Regular $n$-gon $\times$ Regular $m$-gon $=$ $m,n$-duoprism
These shapes are all too geometric and lack the “flavor” of the real world. Since any shape can be subjected to a direct product operation, a Zhihu netizen asked a question:
The action R×R=R² extends a one-dimensional space to a two-dimensional space. So, what does “myself x myself” represent? (Just a brain teaser, looking for inspiration)
The human body is a 3D graphic. “Myself x myself” should result in a 6D graphic, and it is indeed too difficult to imagine what this graphic looks like. But I can use the direct product of two irregular 2D graphics to get a 4D graphic and visualize it through Tesserxel to give everyone an intuitive sense of this type of graphic.
Here I have created three 2D graphics in Blender. From left to right, I named them text, chicken, and person. Now let’s see what kind of sparks these three graphics create when they are subjected to a direct product operation. 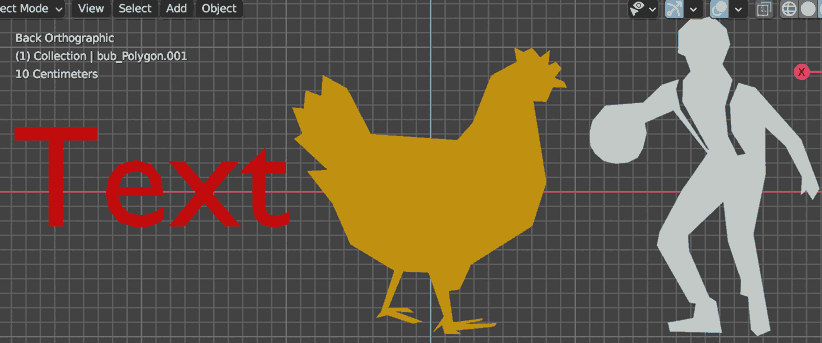
Here I have created four combinations. Click the link to open them:
Similar to viewing the monkey head revolution, the graphics in the cross-section view are ever-changing and bizarrely shaped, but this is not what a 4D person actually sees intuitively. When we rotate these things in the 3D photo view, we can see these two 2D graphics from different angles simultaneously, and they appear many times in duplicate. This is because a direct product is created by continuously translating one graphic within the range of another graphic that is absolutely perpendicular to it, filling all the space it can occupy, so many “copies” appear. Note the first “Text x Text” scene. The graphic “Text” is a whole with four disconnected connected components. The direct product of this graphic with itself will have 16 disconnected parts, which feels like the multiplication distributive property of direct products:
$(T+e+x+t)\times(T+e+x+t) = $ $T\times T+T\times e+T\times x+T\times t+e\times T+e\times T…$
It’s too long, so I won’t write it all out.
If the multiplication distributive property of direct products is difficult to understand, we can look at the construction of a 3D cylinder: graphic A has two solid circles, one large and one small, and graphic B has two line segments. Their direct product will also result in a graphic with four connected components.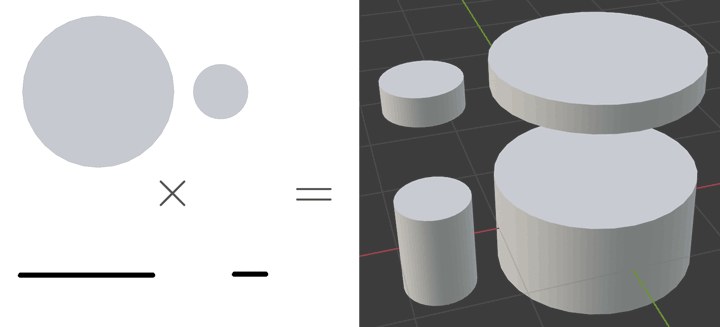
Finally, we have arrived at the everyone’s-favorite “Person x Chicken” graphic. The projection of this graphic on the xy plane is a person, and on the zw plane is a chicken. I will use this example to demonstrate how to operate the view to see the person’s perspective and the chicken’s perspective separately. (When the court opens, everyone remembers to bring their computers!)
First, the control method for this scene is trackball mode. In the default view (figure a below), the graphic fills the entire 3D photo screen. We scroll the mouse wheel to pull the camera away so we can see the entire graphic (figure b below). We now see that the graphic is placed at an angle. We first drag the graphic up and down with the right mouse button to at least straighten the graphic in the vertical direction. Dragging the mouse up will show the white chicken outline, and dragging it down will show the red person outline. Let’s first align with the white rooster (figure c below). Next, if you can see stereoscopic 3D, you will notice that the left and right positions of the 3D photo are a bit skewed. Just drag the model with the left mouse button to straighten it around the vertical axis (figure d below).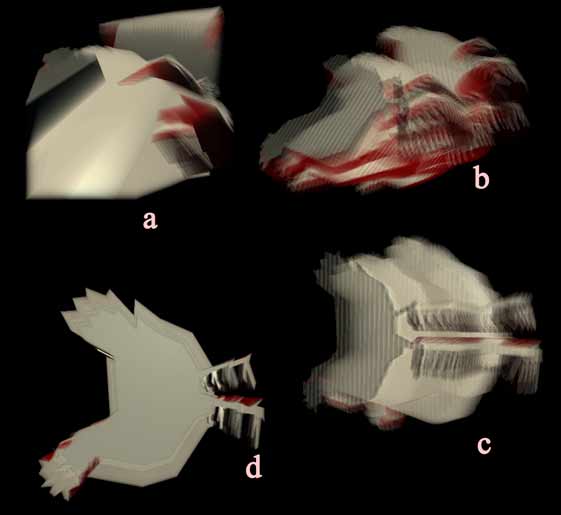
If in the second step, you drag down to see the red person outline and align it, you can continue with similar operations to align with the person’s view. The steps are the same as above.
As for how to operate from a view facing the person to a view facing the chicken, I’ll leave that as an exercise for everyone…
Finally, I’ll talk about the coloring principle of direct products. The surface of a direct product is similar to that of a double cylinder; it can be divided into two parts: one part is the surface obtained by the direct product of the boundary of graphic A and graphic B, and the other part is the surface obtained by the direct product of the boundary of graphic B and graphic A. I colored these two parts red and white, respectively. It is worth mentioning that if you write the previous description as a formula, you will find that the boundary operator $\partial$ used to represent the object’s boundary is exactly the same as the Leibniz rule for derivatives in multiplication!
$$\partial(A\times B)=\partial A \times B + A \times \partial B$$
4D Scenes > City Highway Scene
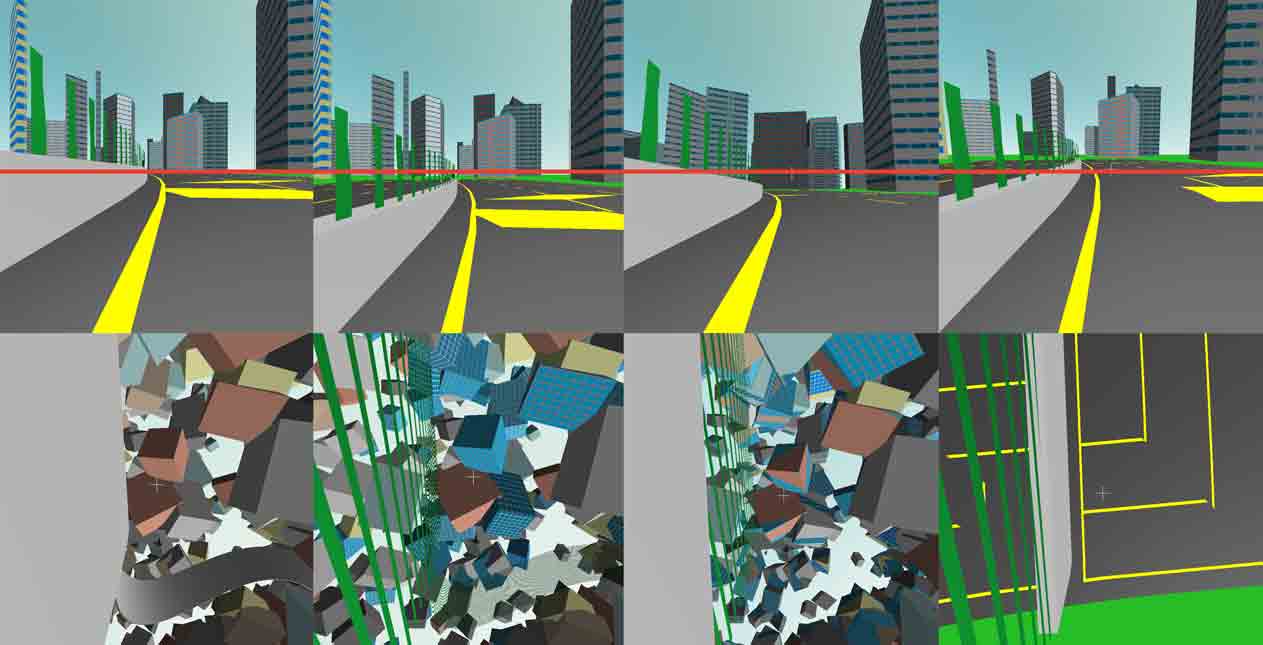
Click the title link to enter the City Highway scene. We will use this scene as an example to help you understand how to operate in the Control: Keep Up Mode mentioned in the previous article. This scene features a bidirectional, 4x3x2=24-lane spatially curved closed ring highway, separated by a median strip. For a detailed explanation of the construction of 4D roads, please refer to 《4D World (II): Road Traffic》 and 《4D World (III): Road and Railway Design》.
Scene Introduction
The ground in the 4D world is 3D, and people can build cities and spatially curved roads on the 3D ground. This scene contains a single-direction 4x3 lane bidirectional road, with the road being a cubic spline space curve. Hypercuboid buildings are randomly distributed around the road, and their orientations are also randomly distributed. We will see them here later, looking like a bunch of randomly floating cubes in 3D space.
The road is bidirectional, separated by a green median strip in the middle.
Camera Control Tutorial
Since there are no cars modeled in this example scene and no corresponding physics engine calculations, you must learn to control the camera manually to follow the road. When you first open this scene and wait for it to load, you will see the default 3D photo view with three cross-section views.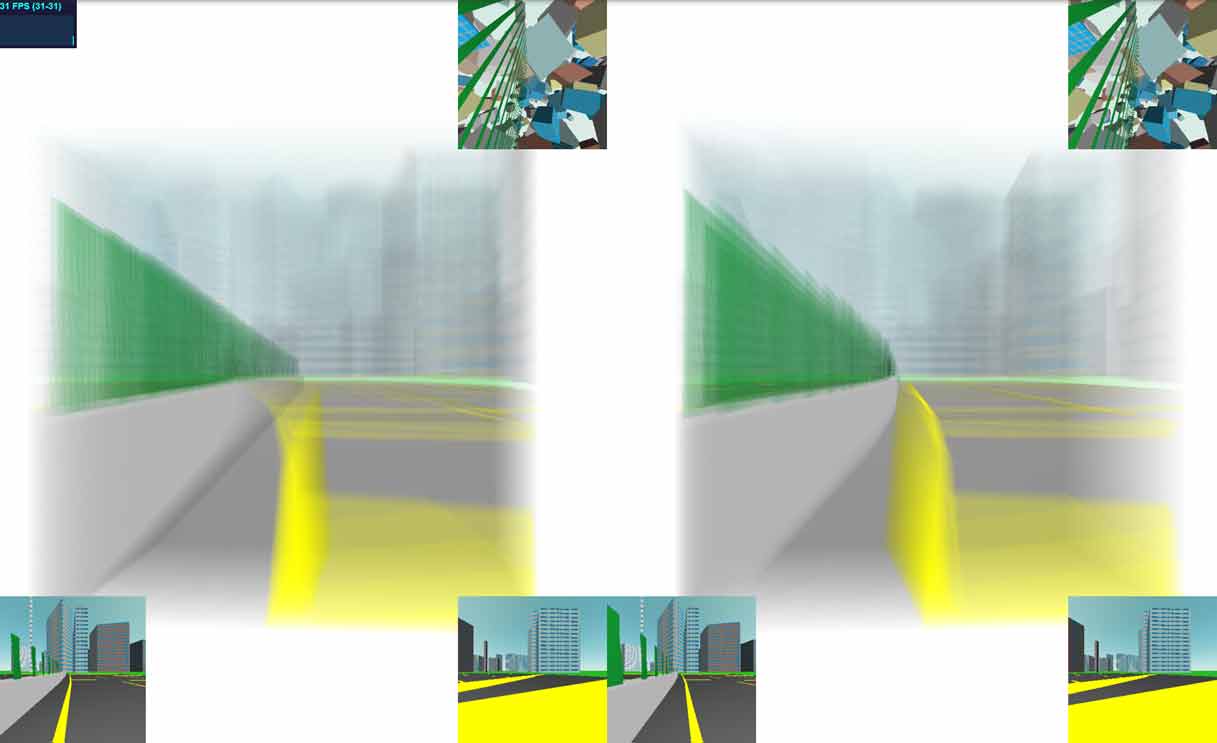
Based on your personal habits, I have listed the operating methods for following the road in the following modes. Tip: If you get disoriented or don’t know where you are, you can refresh the page to reload and reset.
Only using the Horizontal Cross-Section View
This should be the simplest mode. First, press Alt+6 to switch to the horizontal cross-section view mode shown in the figure below. If the keys do not respond, you need to click the screen with the mouse to give it focus before you can continue.

Move the mouse to look around, and you should be able to see a green strip in your field of view. What is this? These are actually guardrails. This is analogous to a 3D road’s guardrail. If the camera’s height is appropriate, the horizontal cross-section passing through the center of the view will cut these guardrails, allowing you to see a strip in the cross-section view. If you accidentally roll the mouse wheel, causing the pitch angle to no longer be horizontal, or press the Space or Shift keys to change the camera height, you might not see the green strip. The figure below shows some possibilities from left to right (the top and bottom images are the normal and horizontal cross-sections, respectively). You can switch to observing several cross-sections at once (Alt+4) to make adjustments. In the figure below, the normal cross-section marks the position of the central horizontal cross-section. This line also falls within the horizontal cross-section, so whatever parts of the normal cross-section it intersects, you will see the same parts in the horizontal cross-section. Tip: Press Alt+C to bring up the crosshairs to help you locate the center of the screen.
If you still don’t understand what these cross-sections are, including why the horizontal cross-section line I marked in the normal view is also in the horizontal cross-section, it is recommended to start from the beginning with 《4D World (IV): Vision of 2D Beings. Here is a figure from the original old article (from here):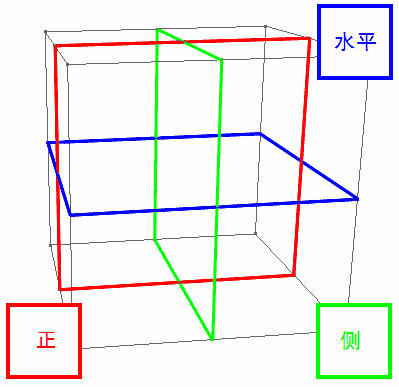
Once you are aligned, you can use the mouse in the horizontal cross-section view to control your direction, and the W/S keys to move forward and backward. This is the same as flying freely in a normal weightless 3D space. If the angle is right, we can see the complete road in the cross-section, allowing us to act as a plane and fly directly along one side of the median strip. To pan left and right directly, use A/D. However, it’s important to note that the horizontal cross-section does not have a true up/down direction (otherwise, it wouldn’t be a “horizontal” cross-section). The up/down direction you see in the horizontal cross-section is a fourth-dimensional side-direction similar to left/right: ana and kata, so you need to use the Q/E keys to move in this direction. If you don’t want to use the mouse to control direction, pure keyboard operation is also possible. J/L are for left/right yaw, and U/O are for ana/kata yaw (i.e., up/down in the cross-section). I/K are for the true up/down pitch angle adjustment. If you accidentally change the pitch angle, you will find that parts of the green median strip disappear, so you need to adjust it back according to the previous steps.
Only using the 3D View
Although using only the horizontal cross-section view is the most intuitive control method, it loses some of the 4D sense: we cannot see the road under our feet at all, only a cross-section of the photo. This cross-section may not even cut the road surface itself. It is conceivable that if a 4D person only looked at this information, they wouldn’t even know if there were potholes on the ground. Now let’s press Alt+3 to switch to a view that only displays the 3D photo. Of course, displaying everything that a 4D person can see comes at a price. For our 2D screen, there are too many overlapping pixels, making it look blurry. So, I once again strongly recommend that everyone learn stereoscopic 3D without glasses, especially the technique for maintaining it for a long time (if you master it, long-term viewing will not cause any eye damage).
The basic principle of controlling with only the 3D photo has also been mentioned in this old article. Here, I will share some specific ideas for this scene: the most important thing is to keep the center of the screen (press Alt+C to turn on the crosshairs) in the center of the road. You may need to hold down Alt to rotate the photo (remember to press Alt+R to reset after rotating, otherwise the directions will be messed up; see here for the principle) or press the Z/X keys to rotate the view to ensure that all ana/kata, left/right directions are centered. Since the lanes are square, the 2D dividing lines in the ana/kata directions are not very clear in the 3D photo. Therefore, rotating the view can give you a clearer idea of which lane you are in. However, since the lane lines are discontinuous dashed lines, identifying the lanes is indeed a big challenge. I plan to write a simulated “real” 4D racing game in the future.
How to See the Road Clearly
Since the scene introduction mentioned that this is a 3D spatially curved highway, how can we see the complete road and display this space curve?
Top-down View
The most straightforward idea is to look at a “map,” which means standing high up and looking down at the entire scene. But note that maps on a 4D planet are 3D, so we see a voxel map. Press the Space key to ascend, and then scroll the mouse wheel to look down at the ground. Or you can first scroll the mouse wheel to look down at the ground and then press Space to raise the camera. This way, you’ll know what altitude is best for looking down. Tip: If you only look at the 3D photo view, you may not be able to tell the pitch angle. You can refer to the two cross-sections at the bottom (normal and side cross-sections) when scrolling the mouse wheel.
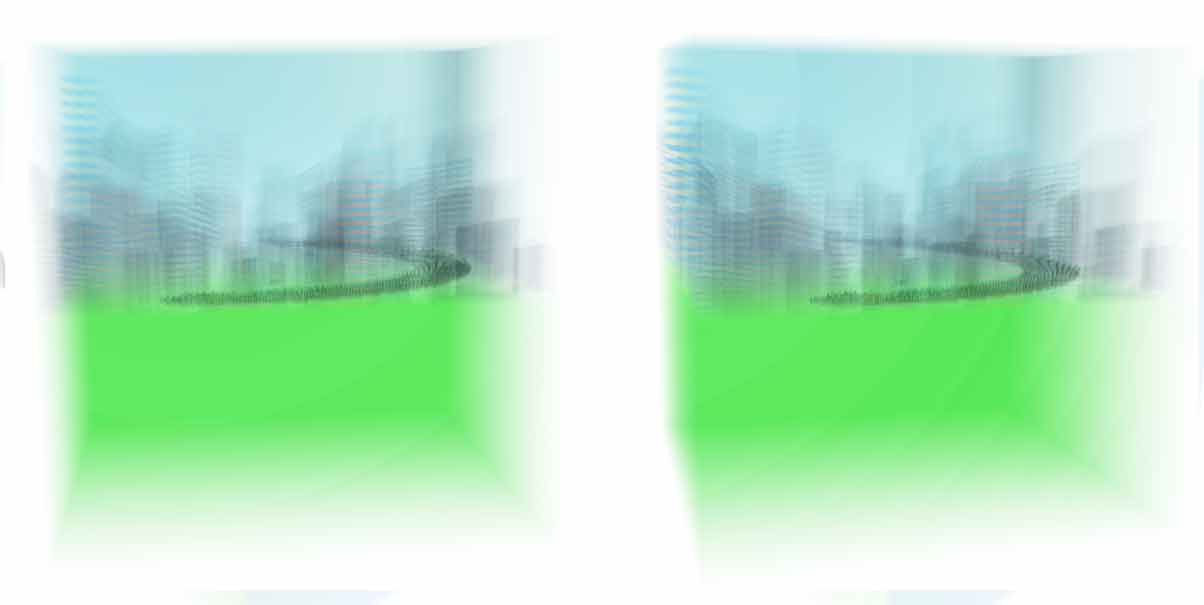
After adjusting the camera’s height and pitch angle, you can see a voxel like this: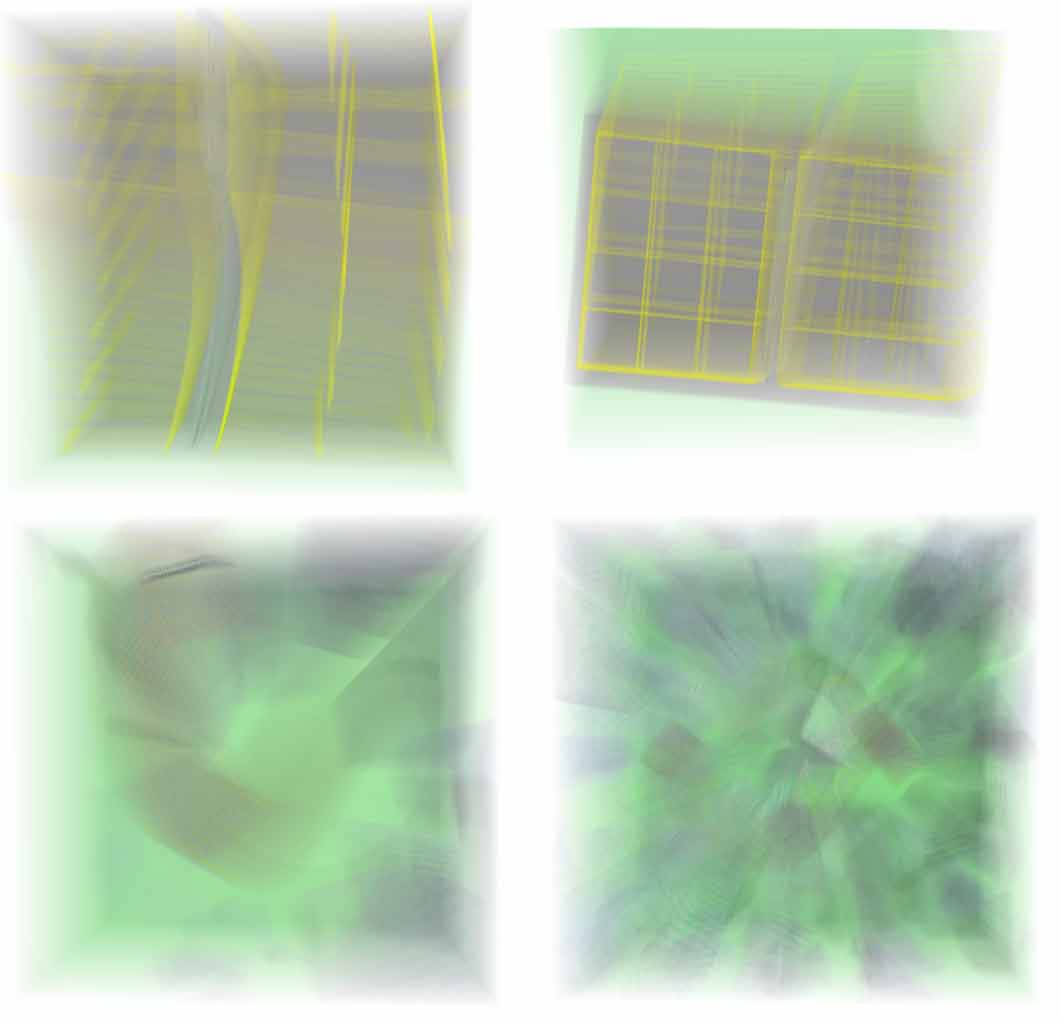
Note that at this point, you don’t need to look at the three cross-sections. We press Alt+3 to turn off the cross-sections (Tip: press Alt+1/2 to restore the cross-sections). Then, hold down the Alt key and drag the mouse to carefully observe this stereoscopic photo. If you can see stereoscopic 3D without glasses, you will easily see the three-dimensional positions of the internal structures. If you can’t, dragging and rotating it a few times should still allow you to see the road’s arrangement. If you are not operating it yourself right now and are only looking at the static illustrations in the article, you will definitely feel that these are all a chaotic mess and cannot be seen clearly. Don’t worry, I have specially prepared a screenshot of the top-down view after removing the fog for you: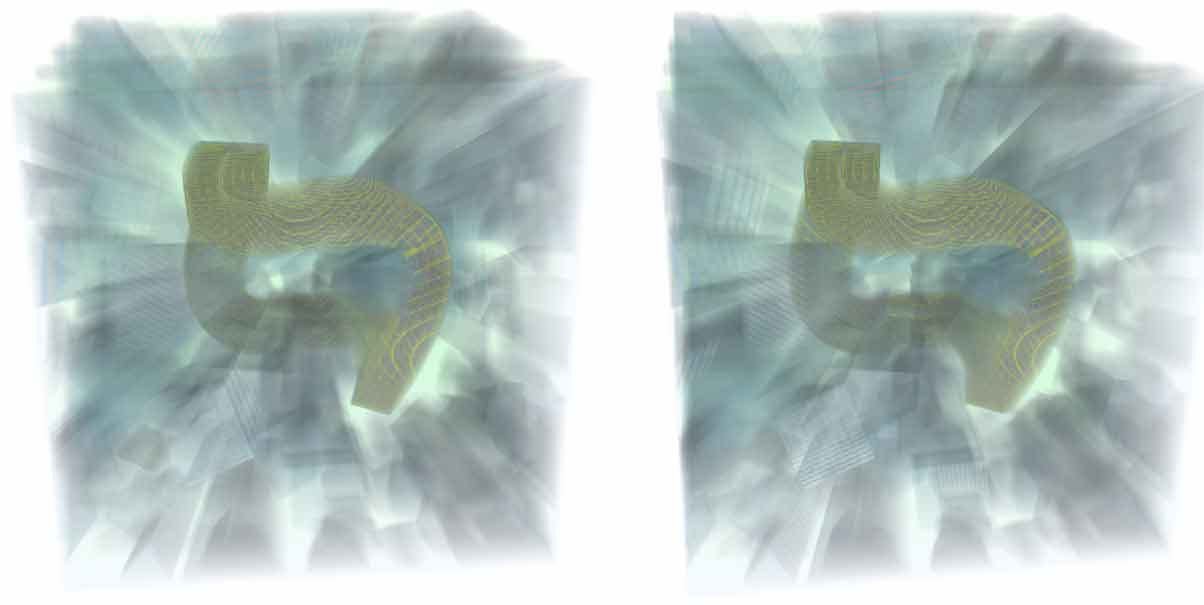
Why is the fog not removed in the online example scene? Because the fog here is actually the color of the 3D ground “covering” the entire 3D voxel photo. If it were all transparent, it would be difficult to see the ground again. So, deciding which pixels to make transparent in the voxel photo is indeed a difficult trade-off for us 3D beings with 2D retinas (at this point, the 4D beings who can see all the voxels directly are secretly laughing).
Finally, here is another top-down view that clearly shows the lane divisions: the dashed lines in perpendicular directions are staggered. You can see that there are a total of $3\times 4=12$ lanes on one side.
Observer’s View
Imagine if a 2D being was faced with a 2D maze, how would you show them a map to help them complete it? It would be unsolvable for them. Even if we draw a map, they can never look down on it; they can only see it from the side. Therefore, the map would have to be made transparent for the 2D person to see its interior. So, rather than saying we saw a top-down view of the city highway scene, it’s better to say we were still looking at it from a “side” view. Only a 4D person can truly see the 3D voxel photo from a “front” view. They will directly perceive the shape of that space curve from their stereoscopic retina, while what we see is still a 2D projection of the space curve from a certain direction. It’s like a feeling of “I cannot see the true face of the mountain, because I am in it.”
Since this is the case, we might as well look at the road from a perspective where even a 4D person sees a projection. This is what was mentioned earlier in the horizontal cross-section view (Alt+6), where you can see the direction of the road’s curvature by cutting the green median strip or the concrete base below. But note that in a 4D person’s 3D vision, they can see both the median strip and the concrete base below simultaneously, only in a very thin slice at the ground plane. This is similar to how we see a distant road. We can only see the median strip or the guardrails and greenery around it. Note that in the 3D world, when we look at a road near the horizon, both the horizon and the road are one-dimensional, and the road will fill the entire horizon (this is similar to how a 2D being feels when looking at a curve in 2D space). In the 4D world, when a 4D person looks at a road near the ground plane, they can still see the road curving on the ground plane! (This is similar to how we feel when looking at a 3D space curve). This can be experienced in the horizontal cross-section view, because when you look level, the horizontal cross-section cuts the ground plane.