A Self-Made Computer Piano
How do you play piano using a computer keyboard? Actually, there are many computer piano simulation softwares available, such as EveryOnePiano which I’ve used before, and the more famous FreePiano. Of course, we can also create something similar ourselves. My online piano doesn’t have a specific name, so I simply used the abbreviation EOP (EveryOnePiano) for the Github repository name.
Here’s the link, click to play (IE browser is definitely not supported!)
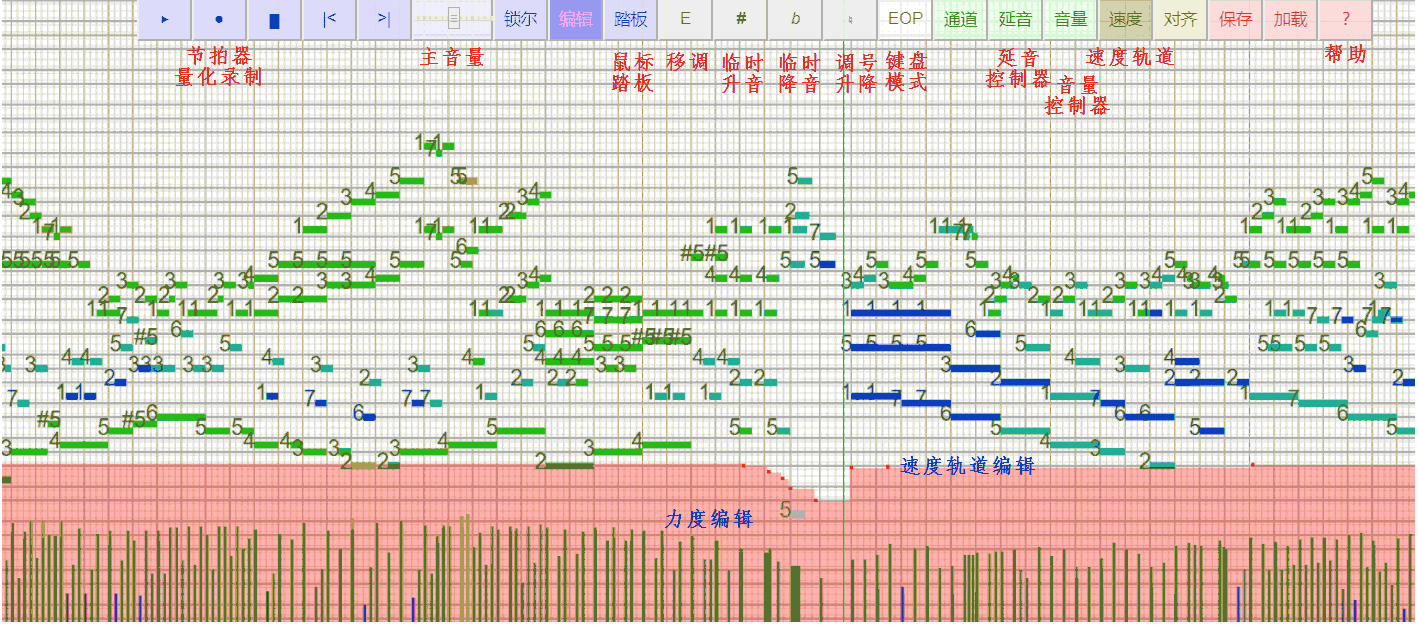
The basic usage instructions can be found in the “?” menu after opening (not very detailed, it’s better to check the examples given later in this article). Click the keyboard button and a virtual computer keyboard will appear on screen, showing the note names, solfege syllables, or functions for each key (holding Ctrl, Shift, Alt will show corresponding function shortcut combinations). This article also includes some usage instructions, but focuses more on recording my thoughts and implementation process.
By the way, if you’re a mobile user, clicking the keyboard can simulate a computer keyboard, and clicking again can simulate a piano keyboard, similar to other mobile piano apps.
- Hint1: Adding different channels in the channel panel can increase the number of piano keyboard rows!
- Hint2: The article includes a trial performance video and explanation of Jay Chou’s song “The Greatest Works of Art”!
How to Play Piano with a Computer Keyboard
Let me focus on computer users below. The question is: computer keyboards are different from piano keyboards, so what's the most reasonable layout? I've seen layouts that directly map ABCDEFG on the computer keyboard to do re mi fa sol la si, but this layout completely scrambles the natural scale order and is unacceptable. Generally, keyboards using this layout are no different from letter-typing practice games. There's an even more ridiculous black-and-white alternating keyboard layout shown below, which is simply an insult to piano! I would never use such a keyboard!
While EveryOnePiano uses this layout: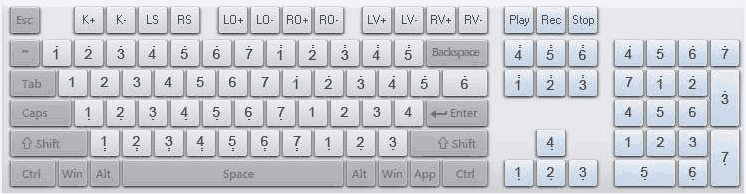
This layout represents the correct scale thinking approach, but it still has drawbacks: it cannot play chromatic scales. Computer keyboards aren’t as long as real piano keyboards. If we alternate black key positions on the keyboard like on a real piano, although this layout would be closest to a real piano, you can hardly expect to perform complete pieces with both hands using it, because there aren’t enough keys and the range would be very narrow. But many pieces have accidentals (chromatic notes), so EveryOnePiano supports setting what note each key corresponds to, allowing you to arrange the needed accidentals according to the piece. This method works very well in performance, and by setting the voice part for each keyboard key, you can even achieve different dynamics for accompaniment and melody (left and right hands). FreePiano can even use a mouse placed under your foot as a pedal, which can be said to have explored the ultimate potential of computer keyboards.
But I’m still not satisfied.
Improvised Free Performance
Initially, my online piano only had functions for playing, recording played notes, and playback. Later I discovered it could assist with composition and arrangement. To be honest, my performance skills aren’t very good, so I never pursue performance effects. My interest lies in composition and arrangement. I need a more flexible way to input accidentals (even if it’s not very convenient for quick input), so I decided not to add key position modification settings to my piano. Instead, I use many methods to set key signature sharps/flats and temporary accidentals. I pondered many solutions, and the evolution of sharp/flat input methods went like this:
- First, there must be a transposition function, so you don’t need to play many accidentals (black keys). But this only works for actual key changes, not for temporary accidentals.
- The most primitive idea was to use the spacebar to make all notes a semitone higher, solving the problem of being able to play all notes on one keyboard. I chose the spacebar because it’s long and can be quickly reached from anywhere for convenience.
- However, this is fatal when playing chords. For example, when playing re #fa la simultaneously, holding the spacebar makes all notes sharp. So I introduced #do, #fa, #sol, #la to the arrow keys to solve this problem: pressing once sharpens the corresponding note, and only pressing shift can restore/clear it. So you don’t have to worry about #5 in minor scales anymore. After pressing arrow key #sol, you can play it, but note that you must press shift to restore before playing natural sol.
- The need to press shift for restoration still wasn’t very user-friendly. I came up with another clever trick: if only one note in a chord needs to be sharpened, why not play it slightly earlier to distinguish it from other notes? I decided to use the spacebar for this function: if you hold the spacebar without playing other notes and then release it, the system will wait for you to play the next note and sharpen it. This way, through subtle time control, you can break free from the constraints of arrow keys and shift keys.
- Later I found my keyboard still had flaws: no #re(♭mi). I also specified: holding Shift+arrow keys can temporarily create ♭re, ♭mi, ♭sol, ♭la. Later I found pressing shift every time wasn’t convenient, so I simply added a sharp/flat toggle shortcut Ctrl+~ to alternate the status of sharp/flat operations: for example, after switching to flat mode, the spacebar will flatten all notes by a semitone instead of the default sharpening, and arrow keys can directly temporarily flatten four notes, while holding Shift actually temporarily sharpens.
- I don’t only improvise; sometimes I also find sheet music to play. Although transposition can be used to play any sheet music, this method is always clumsy and doesn’t help develop perfect pitch. So I designed Ctrl+number shortcuts to set key signatures: numbers represent the number of #s (for example, A major scale with #do #fa #sol would be Ctrl+3). For ♭ signs, use Ctrl+
+number (for example, ♭A major with ♭re ♭mi ♭la ♭si would be Ctrl++4). Key signature settings won’t be cleared by pressing Shift (clearing key signatures uses Ctrl+Q separately), so you can confidently use arrow keys for temporary accidentals. - As for the numeric keypad, I didn’t assign any key positions to it at all. First, to be compatible with laptops, and second, the numeric keypad isn’t arranged horizontally, so putting notes on it has no logic (for example, when sight-reading, you’ll find the numeric keypad is a disaster), so I simply ignored the numeric keypad. In actual use, I found the main keyboard was sufficient.
Although this still can’t completely compare with MIDI keyboards (for example, chromatic scale ascending and descending melody performance is difficult, and keyboard conflicts, a.k.a keyboard ghosting), the experience is indeed much better. These operations are actually customized according to my own preferences. Now using EveryOnePiano’s fixed key positions for improvisation is actually less smooth than my online piano.
Actually, there’s still a lot that can be done here. For example, I previously tried using computers for composition (not using neural networks at all, directly using Math.random() within a certain range in the scale), computer keyboard simulation of guitar with fretting and strumming (too many key conflicts, basically unusable), etc., but they were quite unsuccessful. I also added FreePiano’s function of using mouse clicks as pedals. (Click the pedal button then click lock, then put it on the ground to step on, to avoid accidental operations from foot movement)
Practical Performance
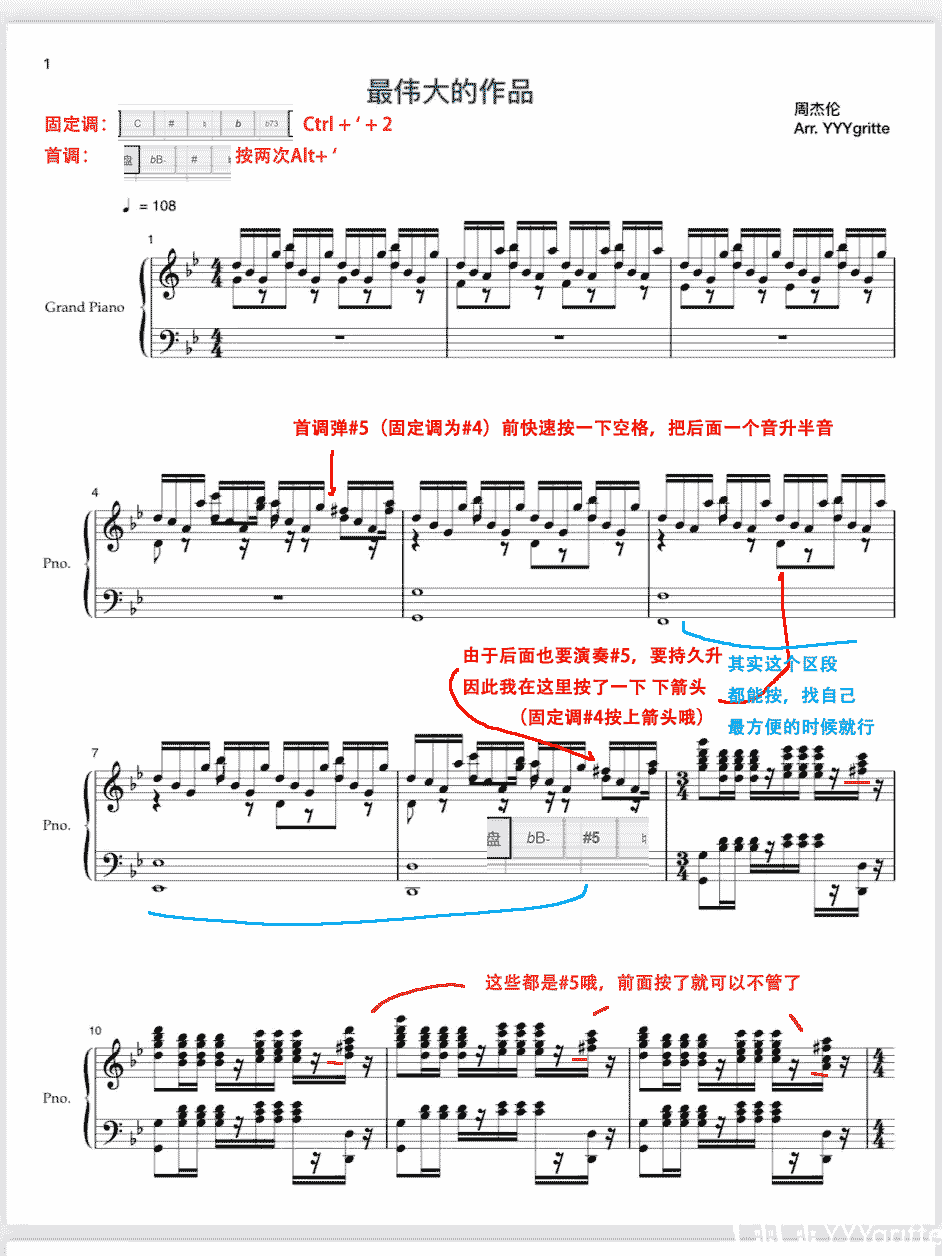
Let me give a performance example below: Jay Chou’s recent new song “The Greatest Works of Art”.
You can also click here to go directly to Bilibili.
Let me analyze this: First, this song is in G minor, with the same key signature as ♭B major. Because I’m used to movable-do, I directly pressed Alt+` twice to transpose (C major lowered by two semitones becomes ♭B major). If you follow numbered notation, do the same as me. To play from staff notation, you need to use fixed-do transposition, see the specific method in the score below. The root notes of the opening chords are la-sol-fa-mi-la-sol-fa-mi, but note that the chord on 3 contains #sol. We need to choose between sol and #sol by pressing the arrow to sharpen sol at the right time, or pressing the spacebar before playing #sol to temporarily sharpen it. Here I used the spacebar in the first section and arrow keys in the second section. Entering the fast-paced section before the “Secret” time travel, there’s no longer sol here, only #sol, so we just keep #sol unchanged to complete the performance. Note that the #do and #re in the final melody la si do #do re #re mi fa mi la do’ si la #so la la’ I achieved by pressing the spacebar twice consecutively. This is the most difficult part of the entire piece, and I recorded many takes here before getting through it…
Entering the main verse, I used four tracks: Percussion, Bass, Strings, and Guitar. Switching instruments is done by adding four channels in the channel panel in the top menu. After recording the first channel, you can right-click to move the position line to the first note, click play, and simultaneously perform the next track for layered recording.
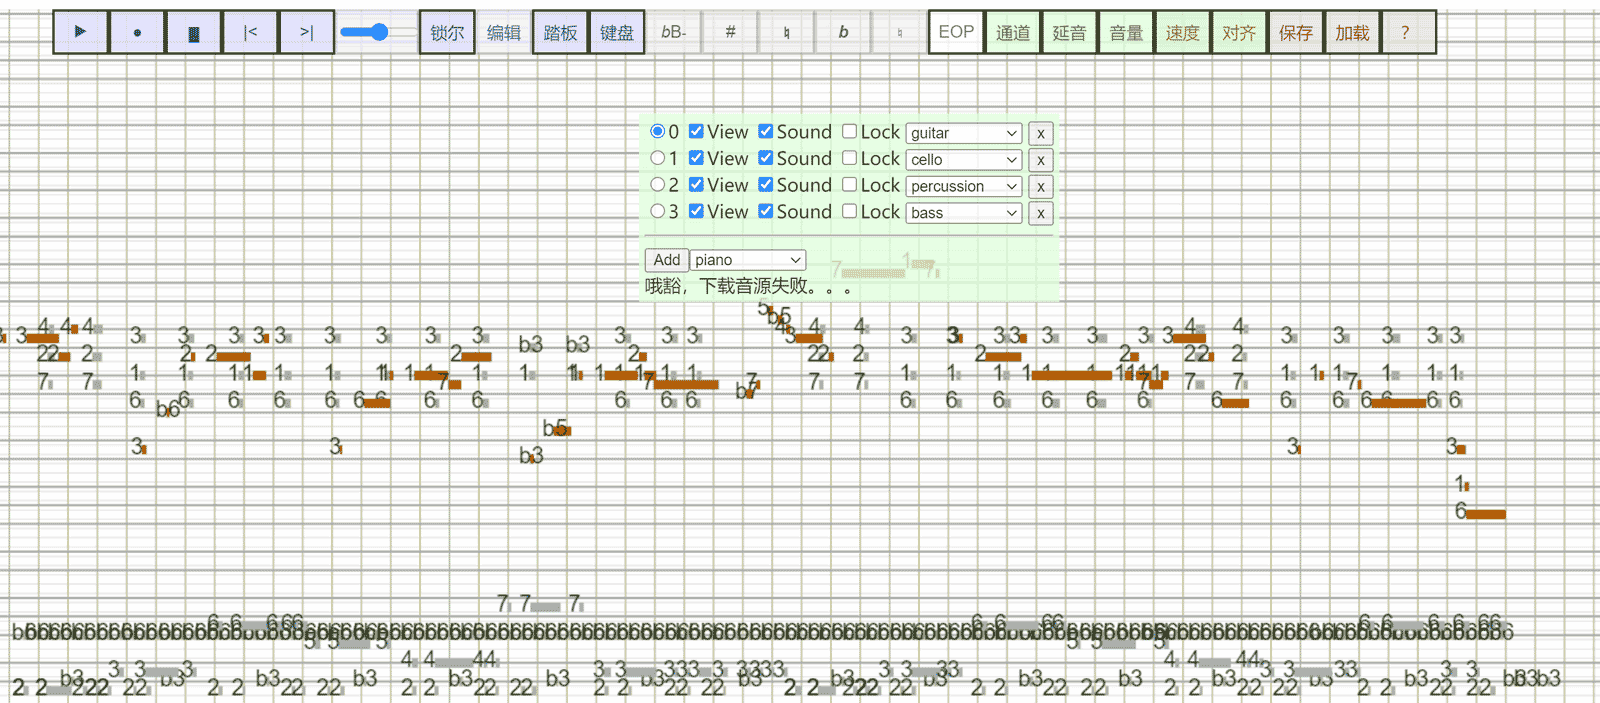
Note that percussion key positions are a bit special: MIDI standard specification maps percussion instruments to white and black keys on the keyboard, so we need a keyboard that can conveniently play black keys directly. Click the “Eop” button in the menu to switch keyboard mode to “Ki” mode. Since the bass drum is in the low register of the piano keyboard (note re..), we press Ctrl+F consecutively to lower by one octave, and only then can we find the bass drum soundfont in “Ki” mode.
Don’t underestimate its performance capabilities! I can use this keyboard to perform variations 1, 2, 4, 5 (first half only), 7, 10, 30 and aria from Bach’s “Goldberg Variations”. Of course, my technique is still too poor; only 1, 4, 30 are relatively fluent. Maybe I’ll make another demonstration video in the future (translation: procrastination).
It seems Liszt’s “La Campanella” would be slightly easier on computer keyboard (proof left as exercise), but it hasn’t entered my practice plan yet (translation: continue procrastination).
Becoming a MIDI Editor
Without a MIDI keyboard, arranging must rely on drawing notes one by one with the mouse, which is slow and error-prone. The music produce software Cubase I use also provides keyboard piano input functionality, but with very few key positions, it’s not practical. Unfortunately, JavaScript cannot communicate with these softwares, but I can edit in this online piano first, then export as a MIDI file, which can then be imported into professional music softwares for post-processing. So I added MIDI file import/export functionality to the online piano. Actually, I designed file saving very early on, but at that time it was intended for sharing music snippets with friends, so I designed my own base4096 format using 4096 Chinese characters to encode binary data, inspired from base64 encoding. Later, due to the need for interoperability with other arranging software, I abandoned this format and switched to MIDI file format. I also discovered that after Cubase occupies the sound card driver, other applications cannot make sound, and even after releasing resources in the background, you have to restart, so I’m more inclined to complete work in my online piano, especially work like early audio transcription and note recording. I gradually added volume, velocity, BPM (tempo) adjustment, multi-channel loading of multiple soundfonts and other functions, and can now roughly play various MIDI files downloaded from the internet.
Since my performance ability was already poor to begin with, plus computer keyboards are even less convenient, real-time recording of note values for arranging is also quite unrealistic. So I created a special editing mode that can automatically wait for note input, etc. Then there were various fixes and patches. If I occasionally have new ideas, I’ll update it from time to time. (P.S. Seeing the spaghetti code, I probably won’t want to touch it. I’ll plan for a 2.0 refactor in the future)
Technical Details && Initial Ideas
I started this idea after seeing a library called Midi.js, which uses HTML5’s new Web Audio standard to play audio clips. Its original purpose was to enable MIDI files to play directly on browser HTML5 audio. MIDI files are different from regular mp3 and wav files - they don’t record sound waveforms, but record information like note pitch and duration to play music, so their files are smaller and were a common format for ringtones in the pre-smartphone era.
Using MIDI.js, it’s easy to write your own keyboard piano program (just need basic JavaScript knowledge - directly add keyboard events to play specified sound files) and note performance is almost without delay! I previously made computer pianos using Flash, but the delay was too large (pressing a key would take nearly half a second to make sound). It can make sound in Safari and different versions of Chrome, but Edge browser seems to never have sound. This mainly depends on browser support for Web Audio.
Following the principle of reinventing every wheel and avoiding messy libraries, I downloaded soundfonts myself, abandoned MIDI.js, and wrote my own keyboard piano program. And I discovered that the MIDI.js project was no longer being updated, replaced by a library called tone.js, which is more powerful: it can support some simple synthesizers and effects! It feels like browsers have the potential to develop towards arranging software. But I still didn’t use tone.js, only borrowed part of its source code, such as changing pitch by adjusting playback speed within a small range can reduce loading 2x the soundfont audio clips! This has major significance for improving soundfont download speed.